

How To Create Map Chart In Tableau
Geographic Analysis of business and customer data is essential for revenue growth. By visualizing data on a map, businesses can answer numerous questions such as which regions bring more sales, which countries are more profitable, which countries require more Marketing efforts, etc. All in all, the mapping features of Tableau Desktop gives business the ability to get all the answers to spatial questions.
In this comprehensive guide, you will get an understanding of how Tableau helps businesses visualize data on maps, and how they can prepare different types of maps using this Business Intelligence tool. You can also check our article on Tableau APIs.
Table of Contents
- Introduction to Tableau
- Understanding the Key Features of Tableau
- Building a Simple Tableau Custom Map
- Creating a Polygon Tableau Custom Map
- Building Different Types of Tableau Custom Maps
- Choropleth or Filled Tableau Custom Maps
- Flow or Path Tableau Custom Maps
- Proportional Symbol Tableau Custom Maps
- Point Distribution Tableau Custom Maps
- Heat or Density Tableau Custom Maps
- Spider or Origin-Destination Tableau Custom Maps
- Conclusion
Introduction to Tableau
Tableau is a popular Business Intelligence and Data Analytics tool that was developed to help organizational decision-makers visualize, analyze and understand complex business data and make data-driven decisions. It can be leveraged to create a wide range of interactive visualizations and derive valuable insights. Tableau was founded at Stanford as a part of a computer science project in 2003 with the fundamental goal of improving the flow of any Data Analysis and make data more accessible and understandable to people through easy-to-understand visualizations.
A core Tableau technology, VizQL gives users the ability to visually express data by translating drag-and-drop actions into data queries through an intuitive interface. It was developed and patented by the Co-founders of Tableau i.e., Chris Stolte, Pat Hanrahan, and Christian Chabot.
Businesses of all sizes, operating across different scales rely on Business Intelligence tools like Tableau to analyze their data. Large-scale enterprises like Unilever, which sells 400+ different kinds of products across 190+ countries, to Small-scale local businesses like Marination, an Asian-Hawaiian food truck eatery in Seattle make use of Tableau visualizations to analyze their business data seamlessly.
Tableau offers a free version called Tableau Public along with its numerous paid products and services such as Tableau Desktop, Tableau Server, Tableau Online, and Tableau Reader as part of its suite.
More information on Tableau can be found here.
Understanding the Key Features of Tableau
Some of the key features of Tableau are as follows:
- Data Sources:Tableau offers seamless integration with a large number of widely used platforms for data storage such as File Systems like Microsoft Excel, CSV, etc., Relational Databases like Microsoft SQL Server, Oracle, IBM DB2, etc., Cloud-based Systems such as Google BigQuery, Windows Azure, etc., or other sources such as ODBC/JDBC.
- Attractive Visualizations:Tableau gives users the ability to create different types of data visualizations. For example, users can easily create the simplest visualizations such as a Pie Chart or Bar Chart or some of the most complex visualizations such as Bullet Chart, Gantt Chart, Boxplot, etc. Tableau also comes with information on geographical data such as Countries, Cities, Postal Codes, etc. that allows users to build visualizations using informative maps.
- Wildcard Union and Cross-Data Join:Users have the ability to perform Cross-Data Join and Union in Tableau. This helps in removing the barriers and time-consuming workarounds that were required due to the massive use of numerous data sources.
- Cross-Data Source Filtering:For data with common dimensions, Tableau gives users the ability to perform the filter operation across multiple data sources at the same time. This also results in all necessary edits or changes being made to all worksheets with the same data sources using the same set of filters automatically.
- Mobile Dashboards: Tableau allows users to format all their Reports and Dashboards in such a manner that it is compatible with mobile devices as well. It lets users create custom mobile layouts for their Reports or Dashboard specific to their device.
Hevo is a No-code Data Pipeline that offers a fully-managed solution to set up data integration from 100+ data sources including Tableau and will let you directly load data to a Data Warehouse, a Business Intelligence tool such as Tableau, or the destination of your choice. It will automate your data flow in minutes without the user having to write any line of code. Its fault-tolerant architecture makes sure that your data is secure and consistent. Hevo provides you with a truly efficient and fully-automated solution to manage data in real-time and always have analysis-ready data.
Let's Look at Some Salient Features of Hevo:
- Fully Managed: It requires no management and maintenance as Hevo is a fully automated platform.
- Data Transformation: It provides a simple interface to perfect, modify, and enrich the data you want to transfer.
- Real-Time: Hevo offers real-time data migration. So, your data is always ready for analysis.
- Schema Management: Hevo can automatically detect the schema of the incoming data and maps it to the destination schema.
- Live Monitoring: Advanced monitoring gives you a one-stop view to watch all the activities that occur within pipelines.
- Live Support: Hevo team is available round the clock to extend exceptional support to its customers through chat, email, and support calls.
Explore more about Hevo by signing up for the 14-day trial today!
Building a Simple Tableau Custom Map
To build a Simple Tableau Custom Map, you need a data source, like Sample-Superstore data, consisting of location data, location names, latitude, longitude coordinates. Without geographical coordinates, you can't prepare map visualization in Tableau. A simple Tableau Custom Map can be created by implementing the following steps:
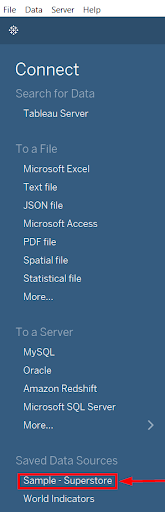
- Step 1: Open Tableau Desktop, connect to the Sample-Superstore data source, and the worksheet will open in front of your screen.
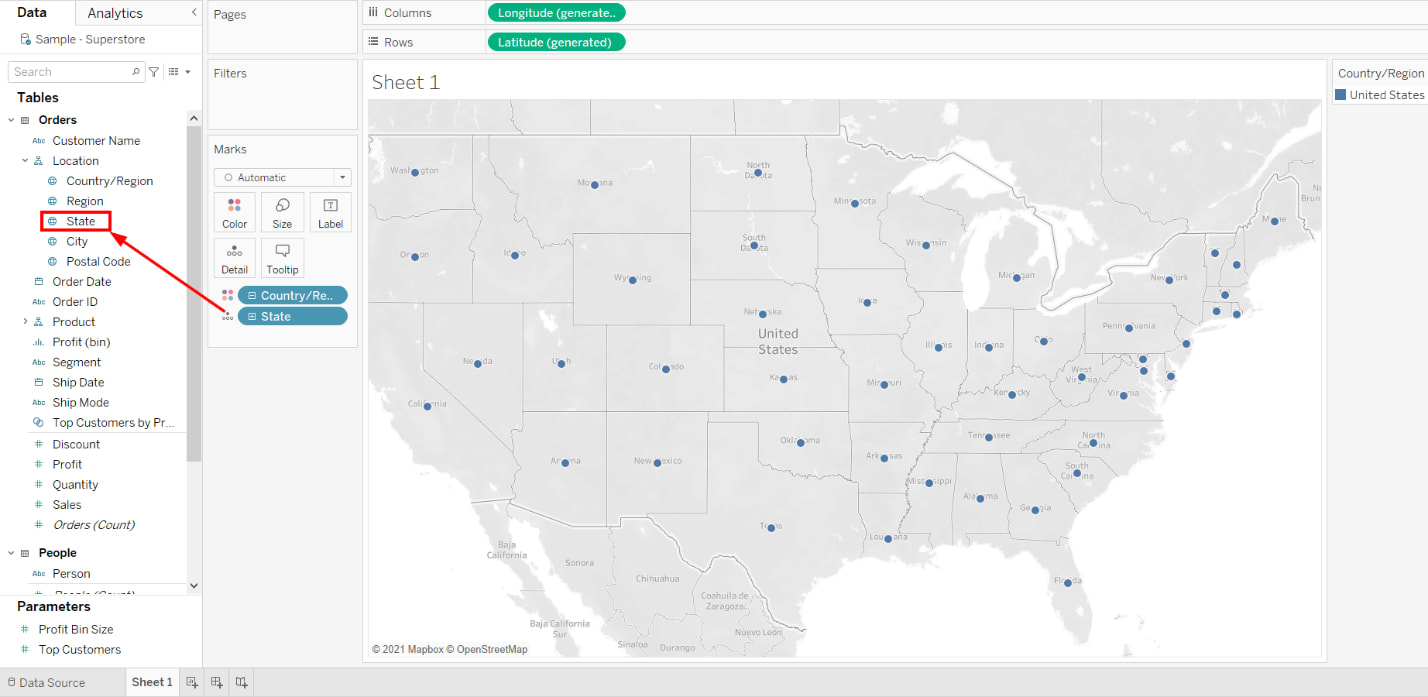
- Step 2: Move your cursor to the Location option, select the Country & State parameter under it, drag both of them to the worksheet.
- Step 3: Right-click over the State and select the Dimension from the drop-down list.
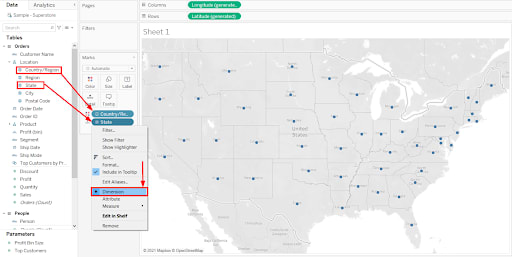
- Step 4: Drag the Sales table to the Mark sheet as shown below.

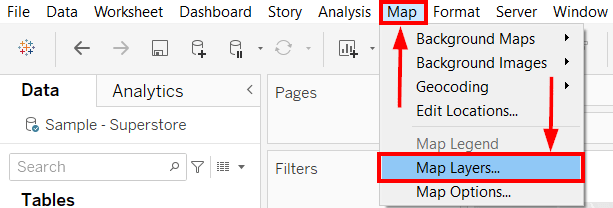
- Step 5: Move your cursor to the Maps tab and choose Map Layers from the drop-down list.
- Step 6: On the Map Layers pane, unselect the Country/Region Names and select Normal from the drop-down list of style.

This is how you can design simple Tableau Custom Maps to perform a basic geographical analysis of your data.
Creating a Polygon Tableau Custom Map
A simple Polygon or Filled Tableau Custom Map helps you understand the basic mapping concepts in Tableau. The following steps can be implemented to create a Polygon Tableau Custom Map:
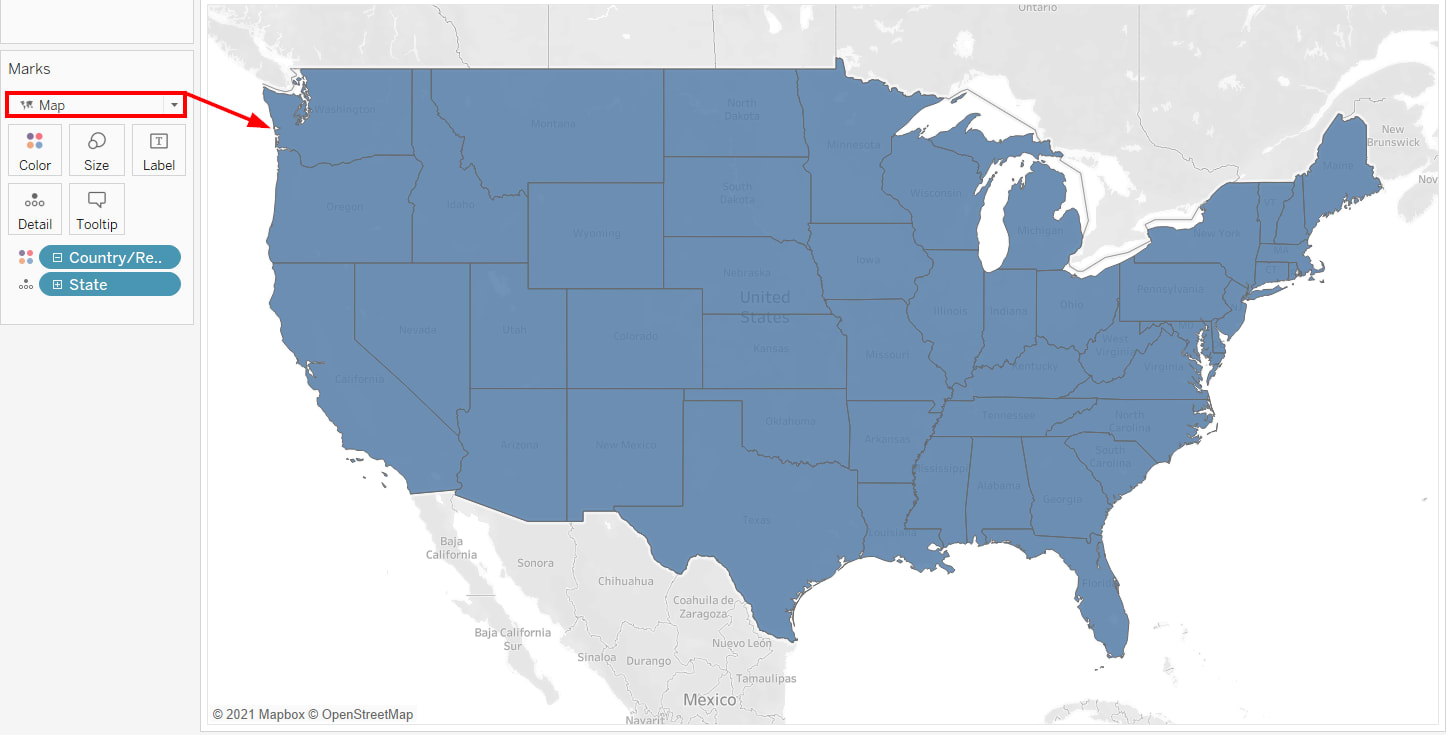
- Step 1: Drag the State parameter from the Data pane to the worksheet.
- Step 2: Move your cursor to the Marks pane, choose the Map option from the drop-down list.

- Step 3: The worksheet will show the following visualization of the map.
- Step 4: Select the Sales parameter from the Data pane and place it over the map.
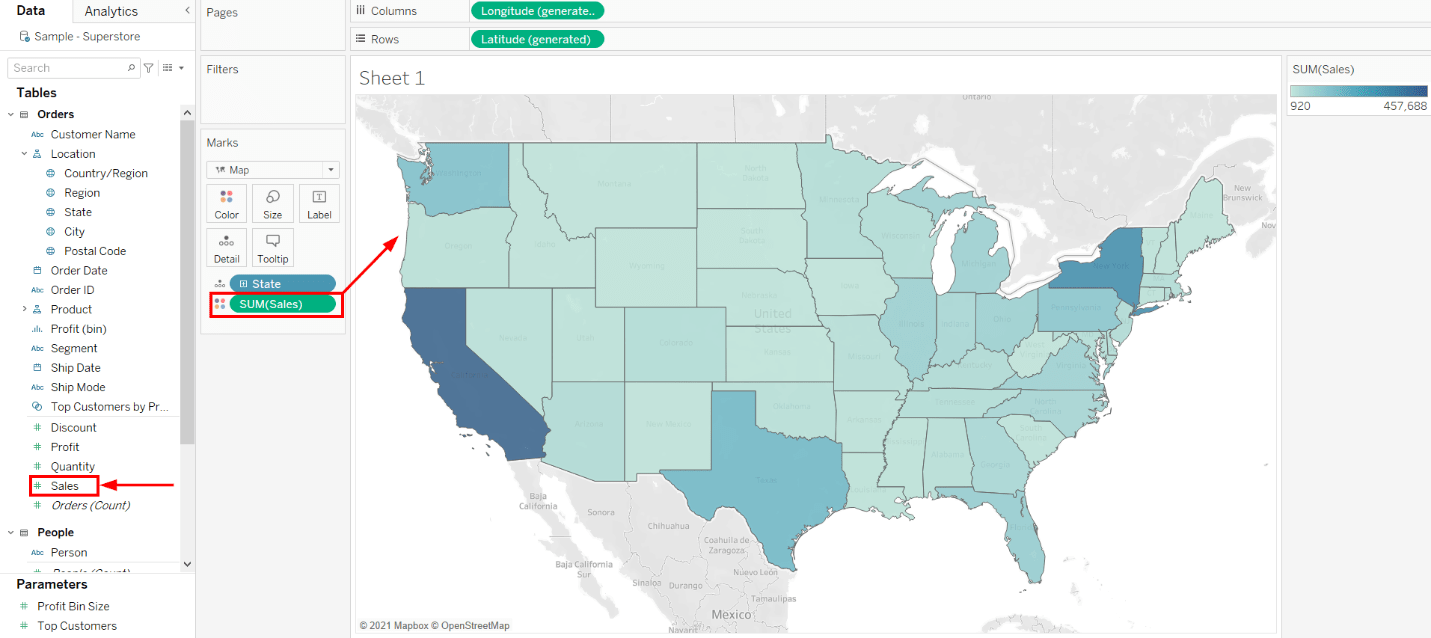
You can see the Number of Sales from the polygons in the updated map.
Building Different Types of Tableau Custom Maps
Tableau Desktop enables you to design the following types of maps depending upon your business needs and visualization requirements. The different kind of custom maps that can be created on Tableau are as follows:
- Choropleth or Filled Tableau Custom Maps
- Flow or Path Tableau Custom Maps
- Proportional Symbol Tableau Custom Maps
- Point Distribution Tableau Custom Maps
- Heat or Density Tableau Custom Maps
- Spider or Origin-Destination Tableau Custom Maps
1) Choropleth or Filled Tableau Custom Maps
Choropleth Maps, also known as Filled Maps, are perfect to represent ratio and aggregated data. Users can use ratio or aggregated data for polygons that can be related to locations, such as countries, regions, states, or any area.
For simplicity, download Tableau Example Workbook and implement the following steps to show ratio or combined data in Tableau Desktop:
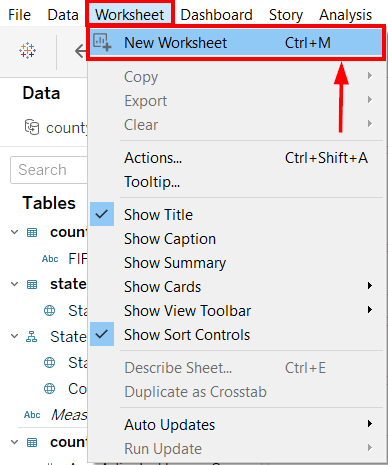
- Step 1: Go to Worksheet Tab and select the New Worksheet from the drop-down list or press CTRL+M. A New Sheet will open.
- Step 2: Under the State, Country dimension, select the State option and move to the sheet.
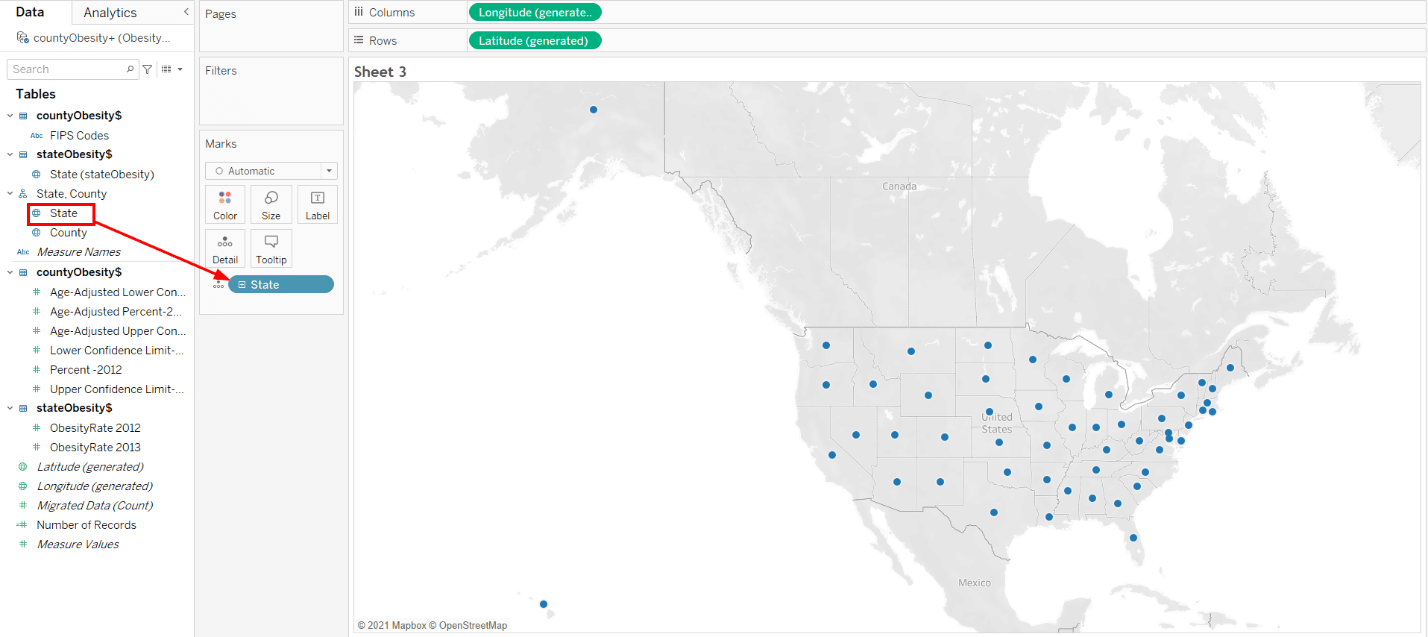
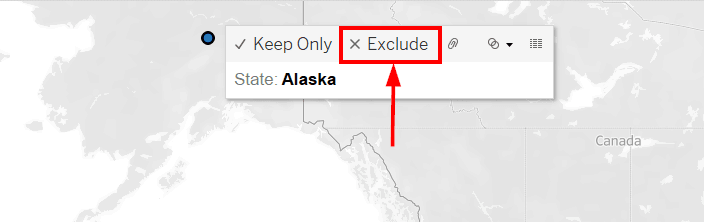
- Step 3: Now select the Datapoint of Alaska, United States.
- Step 4: Click over it and choose the Exclude option.
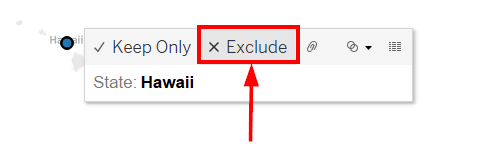
- Step 5: Repeat the same steps for Hawaii.
You'll see a better version of the map.
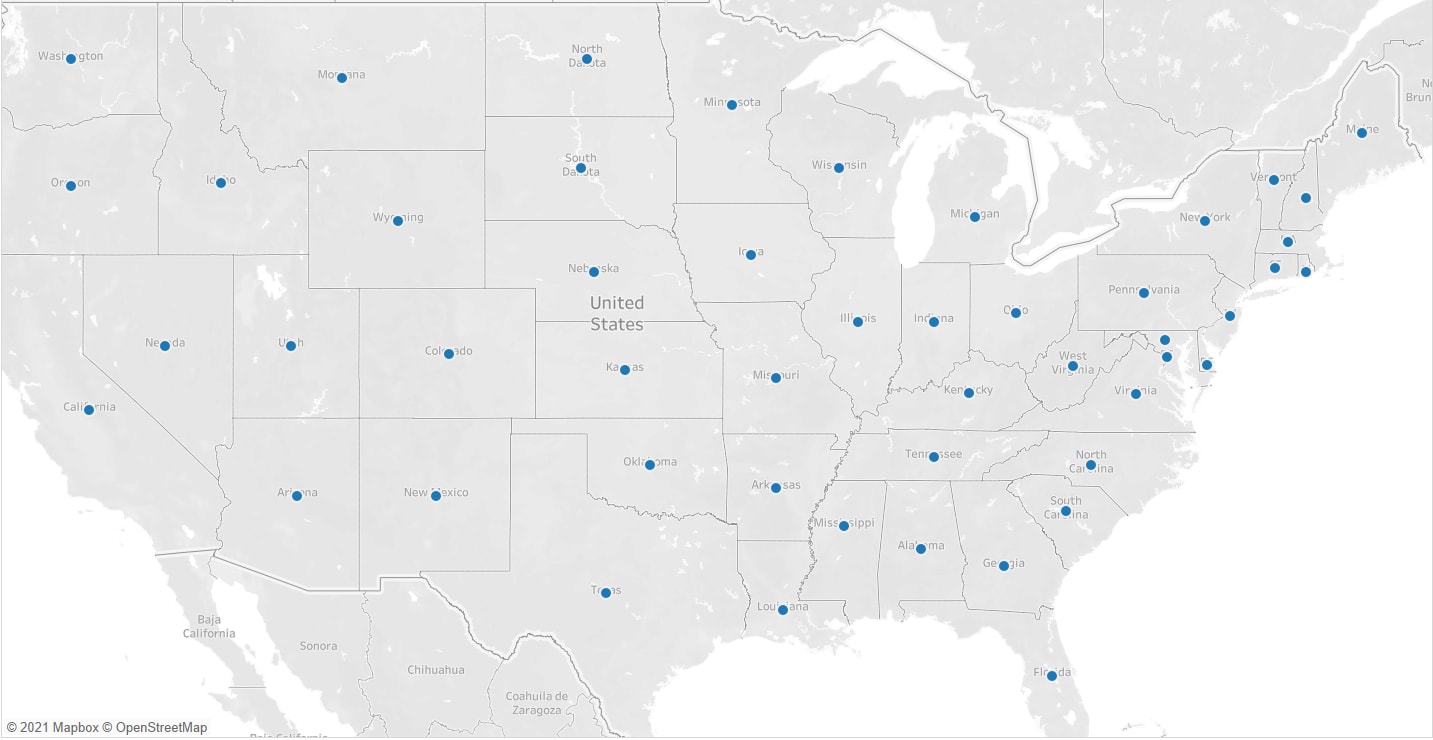
- Step 6: Click on the plus symbol of State to get details of all countries, as shown below.
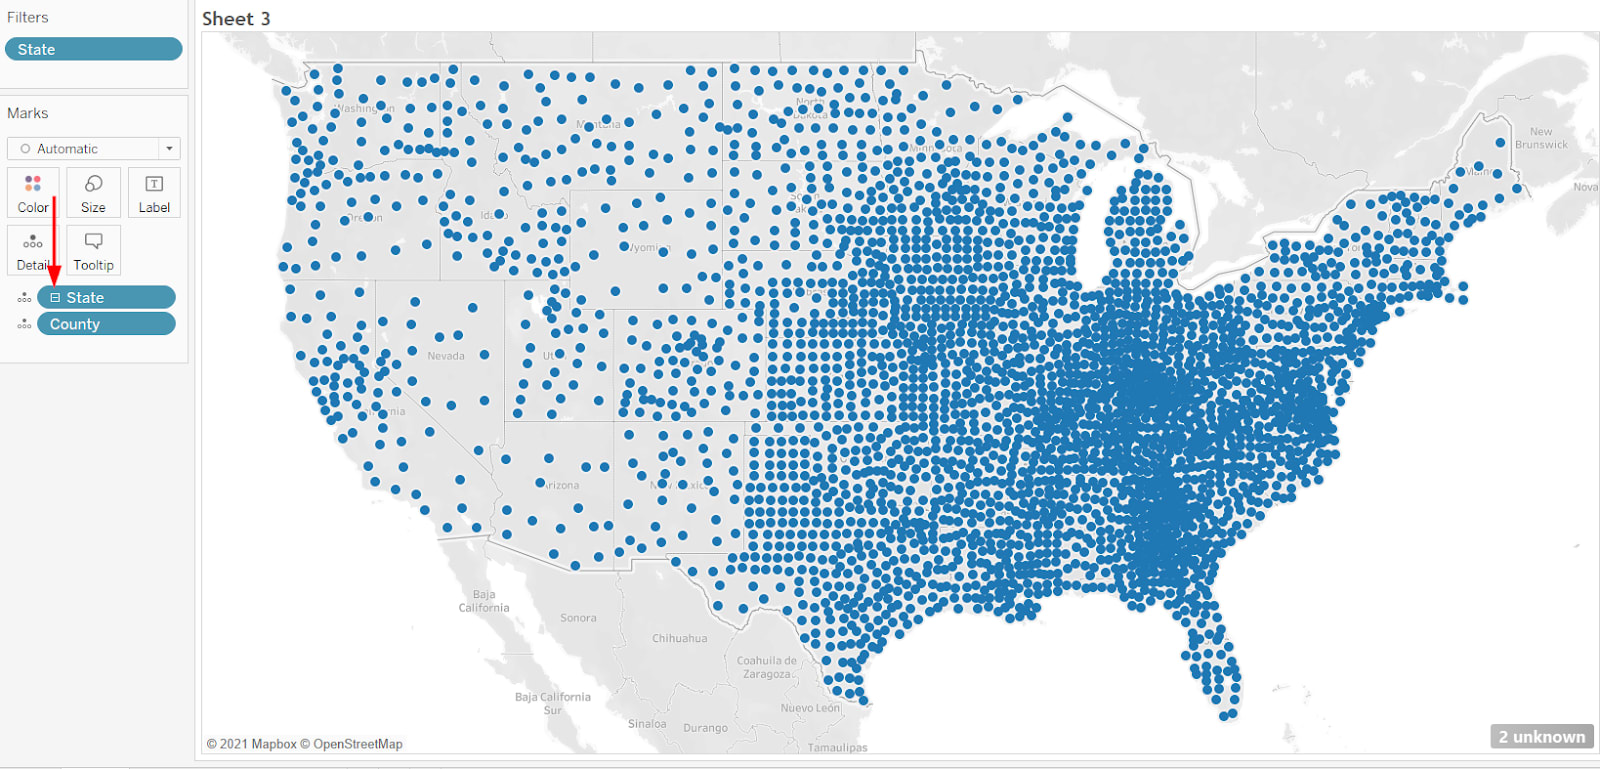
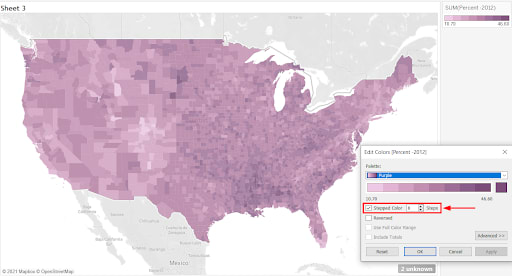
- Step 7: Place your cursor over Percent- 2012 and drop it over the color option.
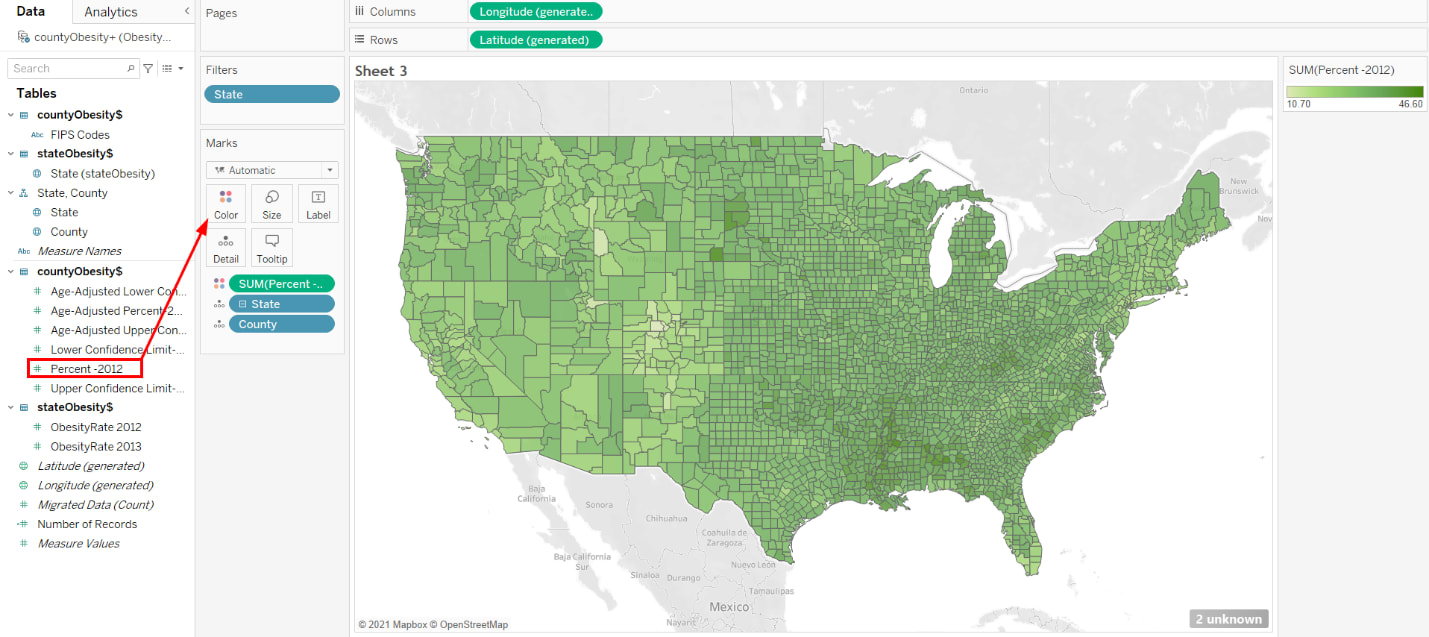
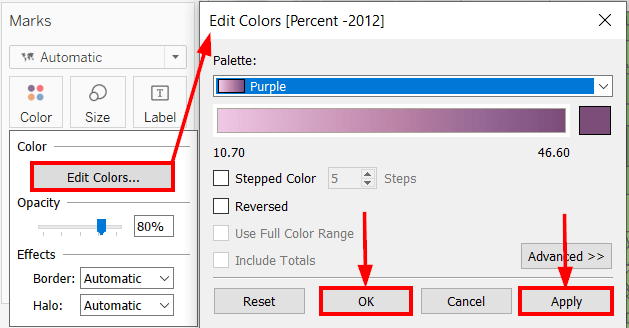
- Step 8: To get the obesity percentage range, select the Edit Colors option from the Color icon.
- Step 9: Select the Purple color and click Apply.
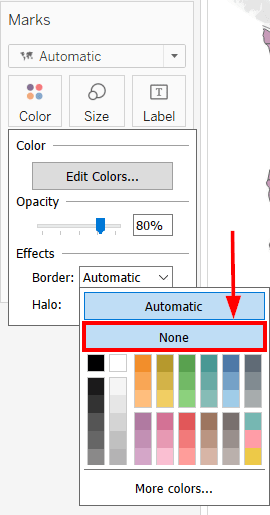
- Step 10: Open the Effect option from the Color icon.
- Step 11: Select the None option from the Border list.
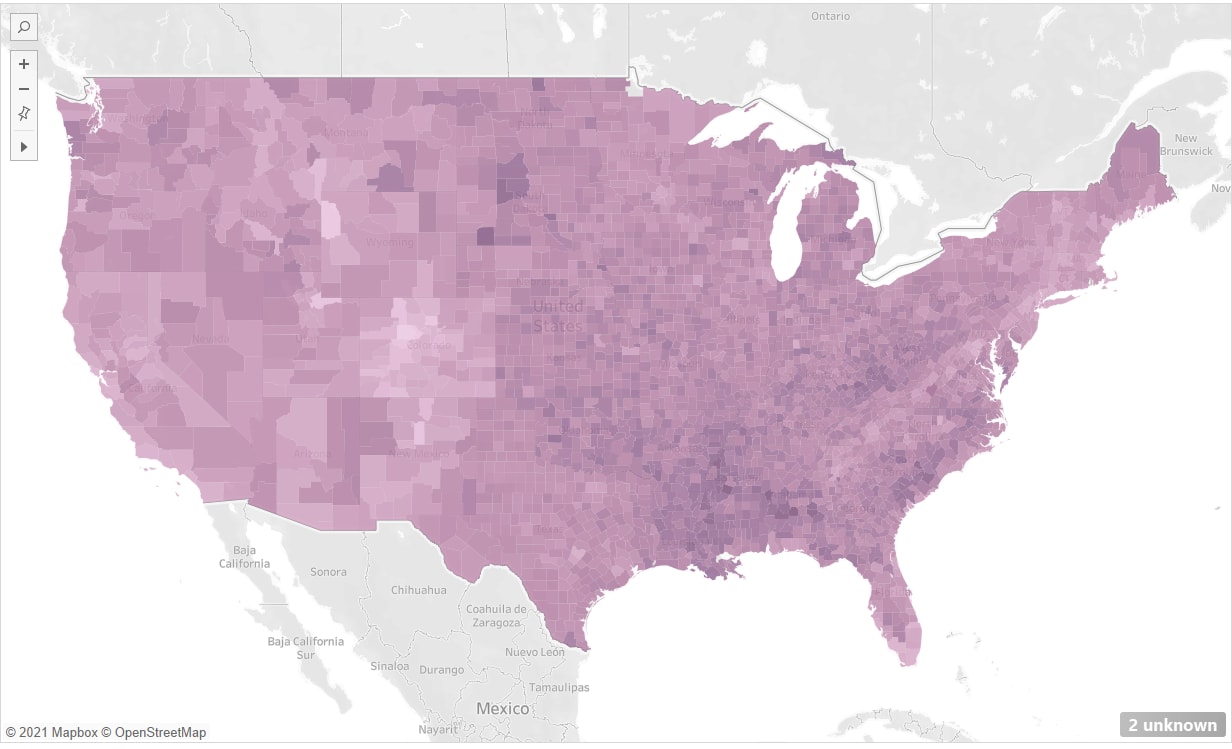
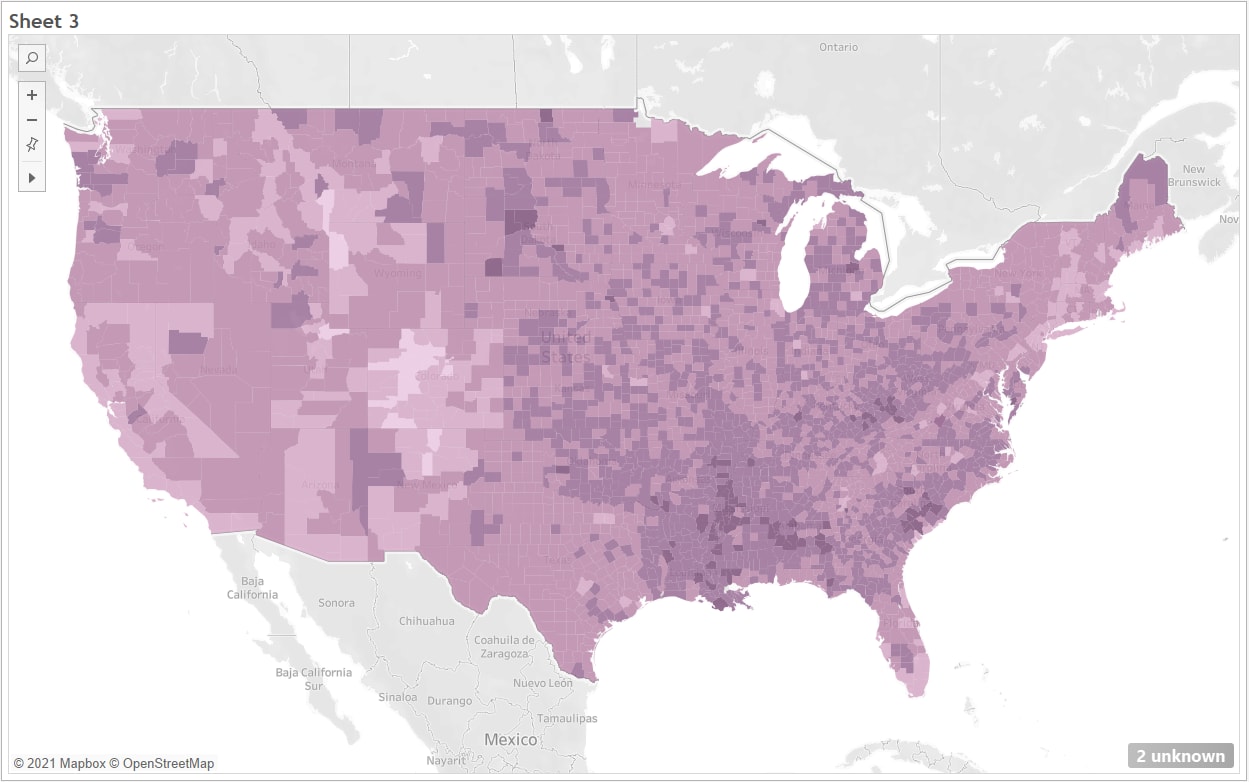
The output of the Choropleth will appear in front of your screen.
- Step 12: In the above map, Tableau selected the default color distribution. However, if you want to change it, go to the Edit Color menu again. Mark the Stepped color and enter 8. Click on the Apply button and close it.
- Step 13: Repeat the same steps, but this time select 5.
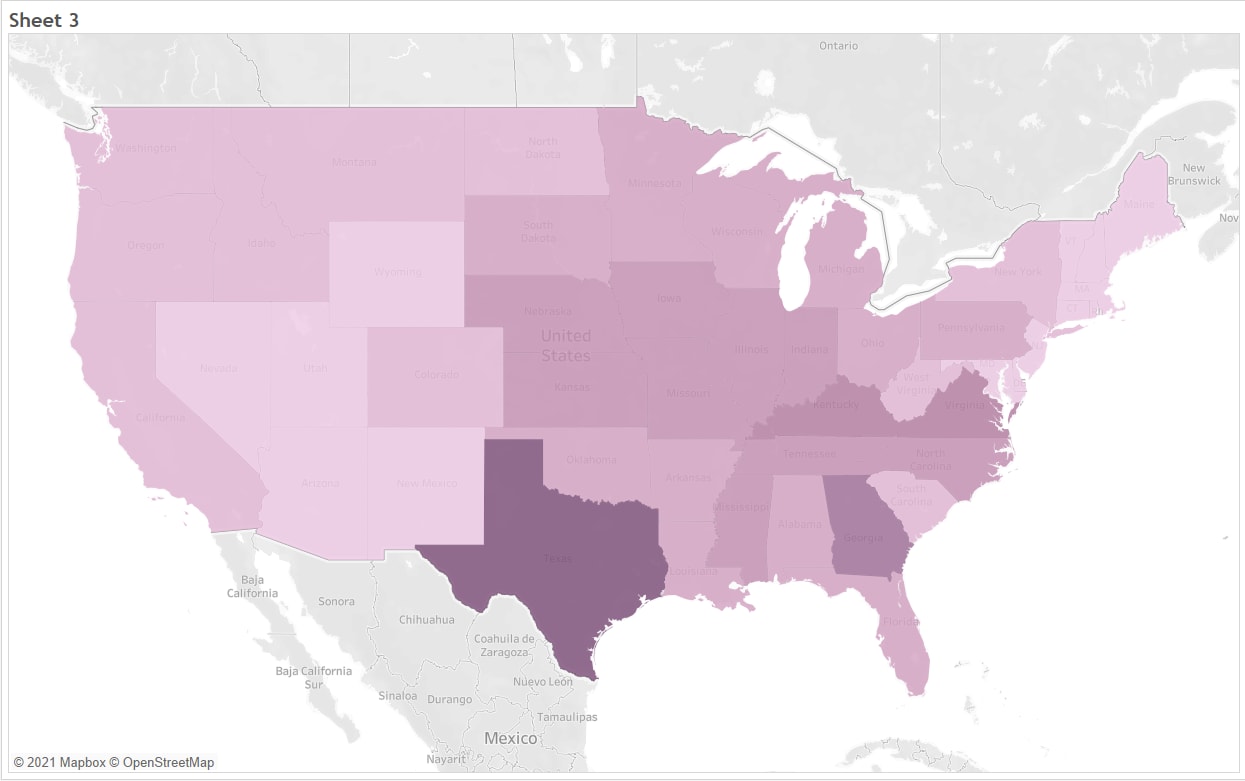
- Step 14: The map view for 4 Stepped Color might look like this.

By selecting 4 instead of 5, you will understand that obesity rates are higher in the South. However, prior maps were showing even distribution of colors or obesity rates in the United States (US). All the maps are great to show aggregate data, yet each is giving you prominent information on obesity rates in different countries.
Similarly, if you want to plot the map for aState Level detail, remove the County from theMarkschart. You can analyze that Texas has higher obesity rates, followed by Georgia.
For more information, see Choropleth Maps or Filled Maps in detail.
2) Flow or Path Tableau Custom Maps
Tableau Business Intelligence tool allows users to determine the flow of path over time, e.g., the path of the storm, through Flow or Path Maps. To create Flow Maps in Tableau, download Example Workbook and implement the following steps:
- Step 1: Open the downloaded example inTableau Desktop.
- Step 2: Open aNew Worksheet.
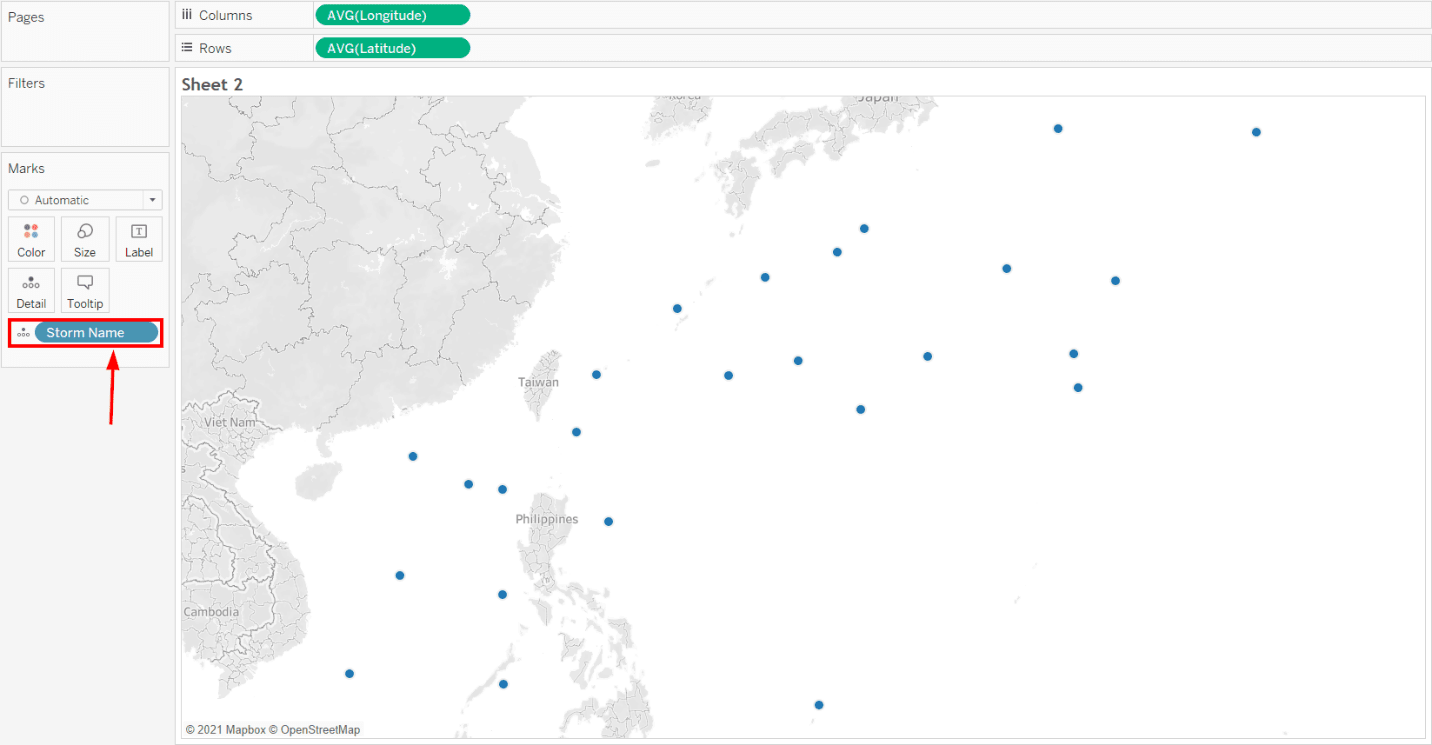
- Step 3: MoveLatitude andLongitude coordinates using the drag-and-drop method.
- Step 4: Choose theStorm Name and place it over the Details icon in the Marks pane.
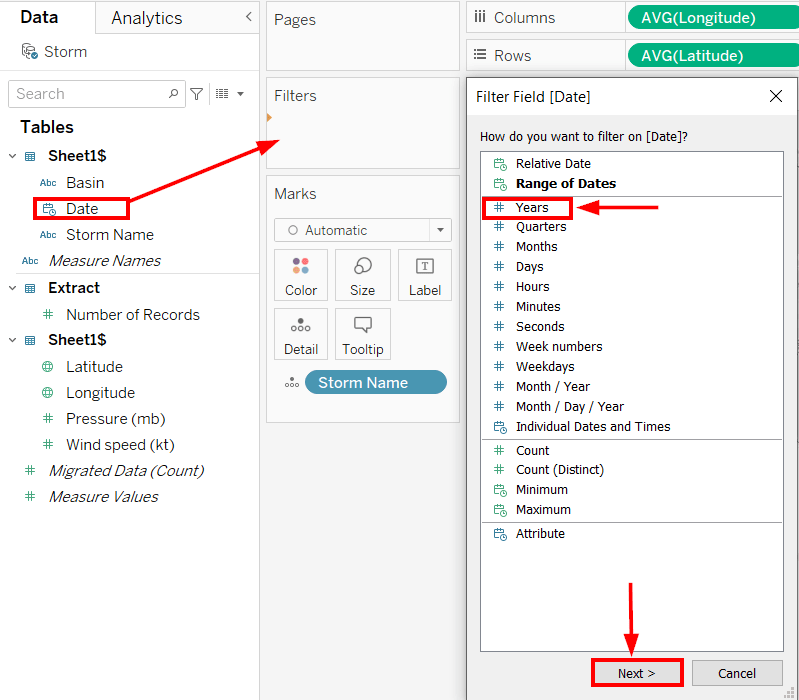
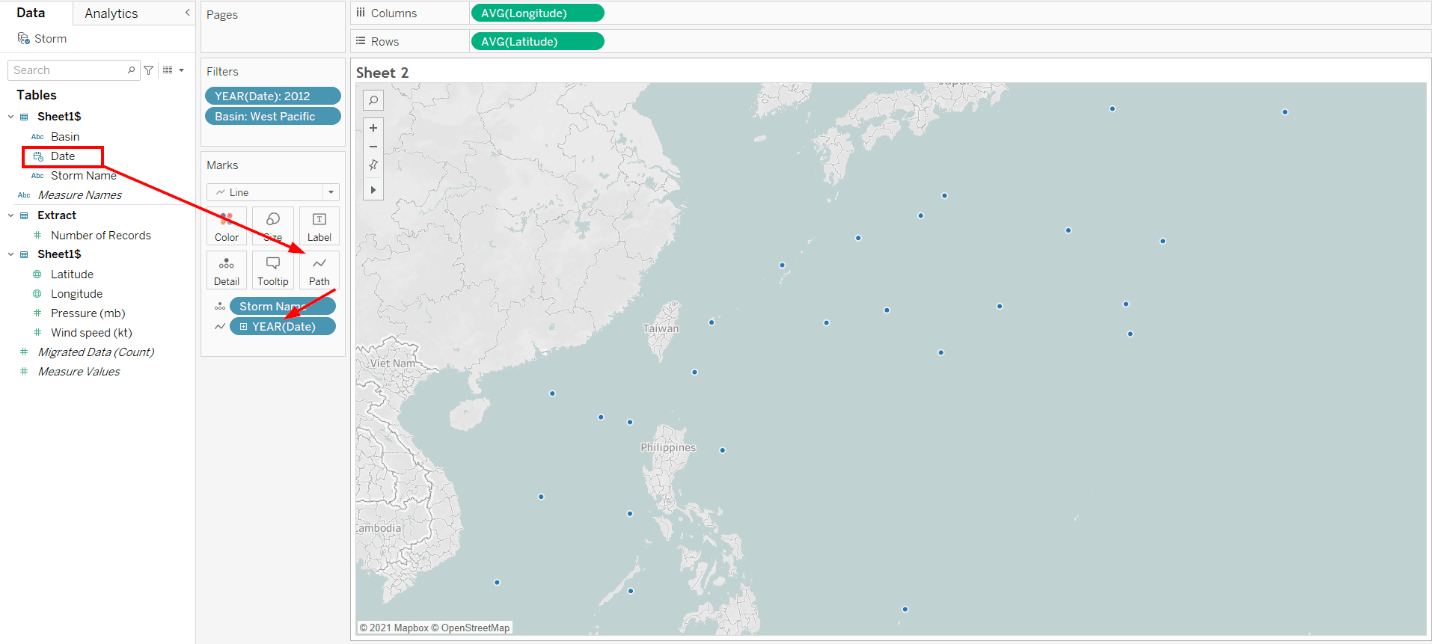
- Step 5: To apply filters, select the Date from the Data pane and place it over the Filters area.
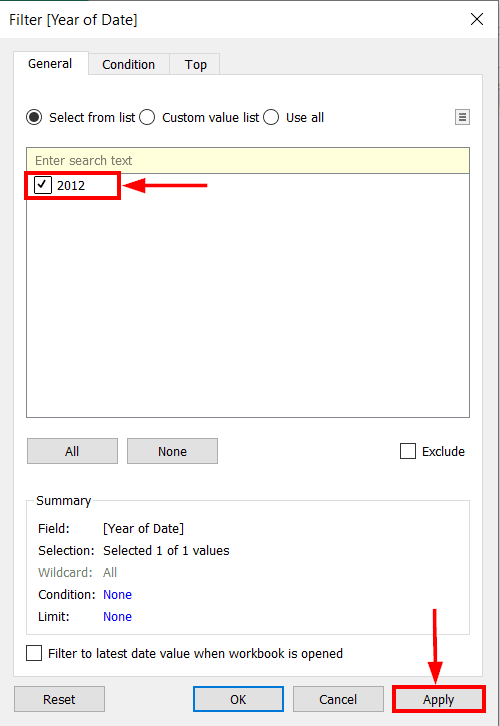
- Step 6: Choose Year, such as 2012.
- Step 7: Click on Apply and close the screen.
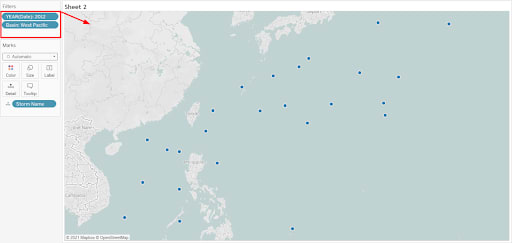
- Step 8: Repeat the same steps for Bhasin and select the West Pacific region.
- Step 9: Select Normal Background from the Map tab. The final map might look like this.
- Step 10: Select a Line from the Marks pane.
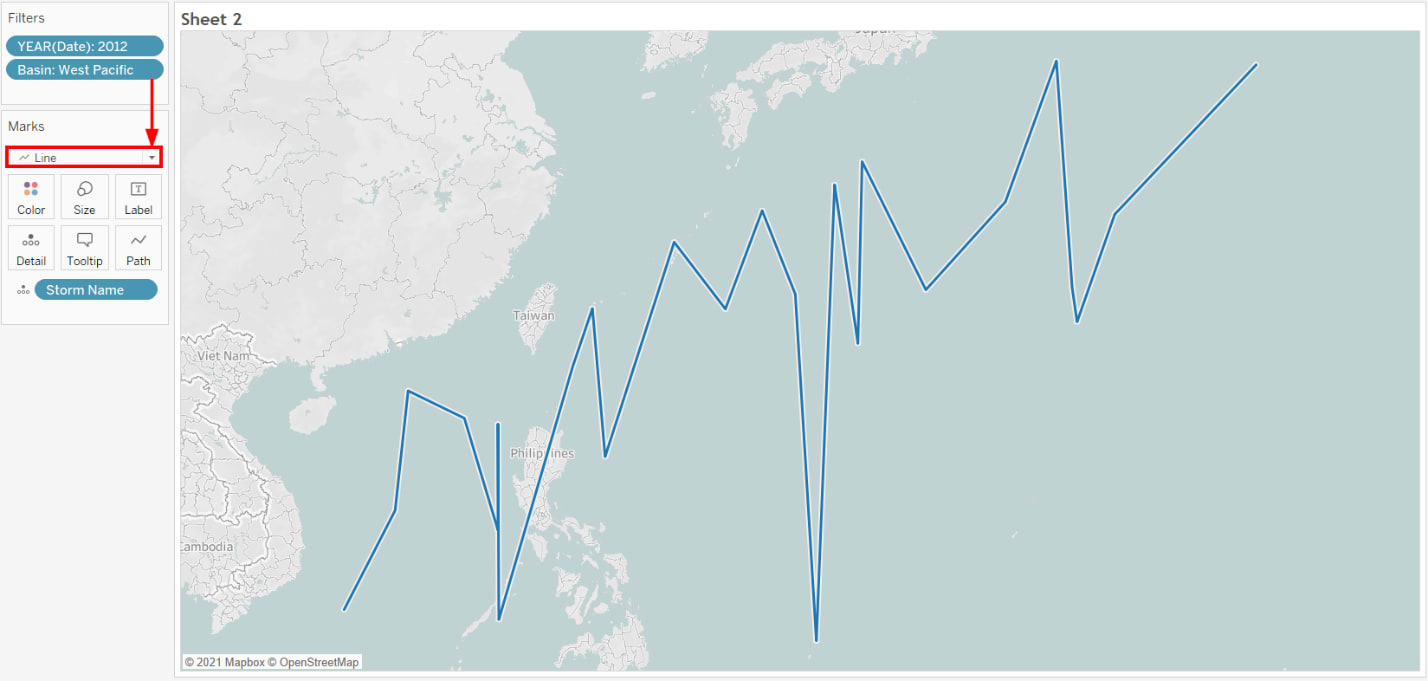
- Step 11: Drag the Date from the Data pane and place it over the Path icon. This will remove the line due to the absence of an exact date.
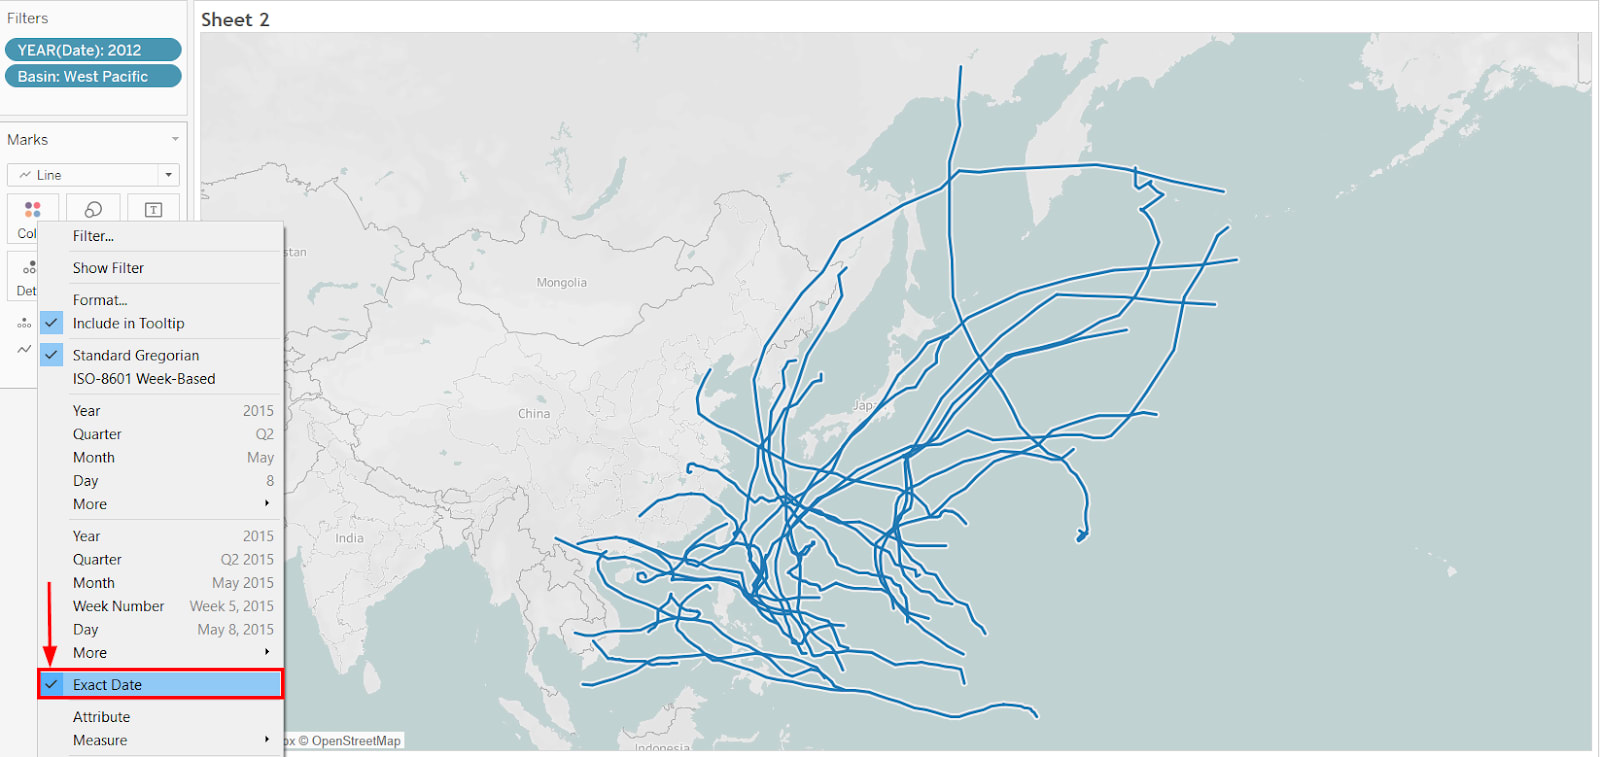
- Step 12: Click on the Date parameter, select an Exact Date option.
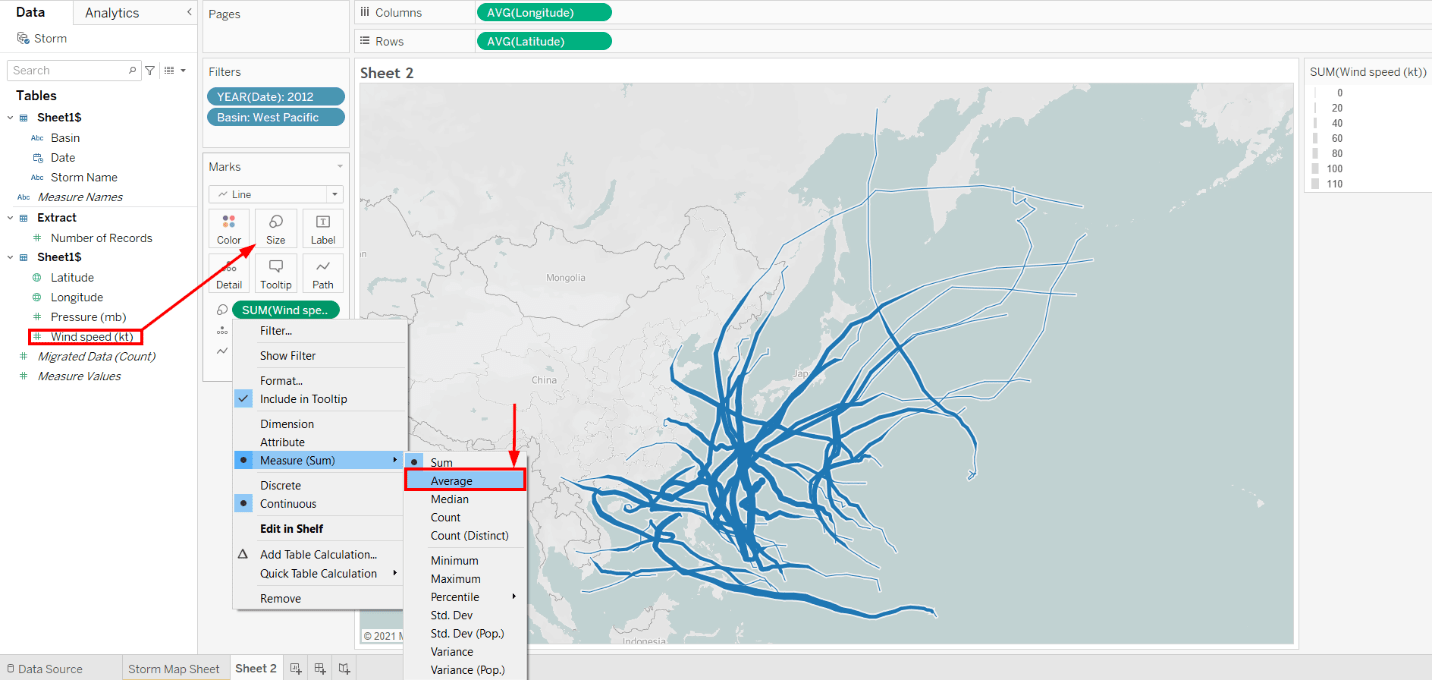
- Step 13: Drag the Wind Speed (kt) from the Data pane and place it over the Size icon.
- Step 14: Right-click over the Wind Speed (kt) and choose the Average parameter.
- Step 15: Place Storm Name over the Colors icon to complete the Flow Map.
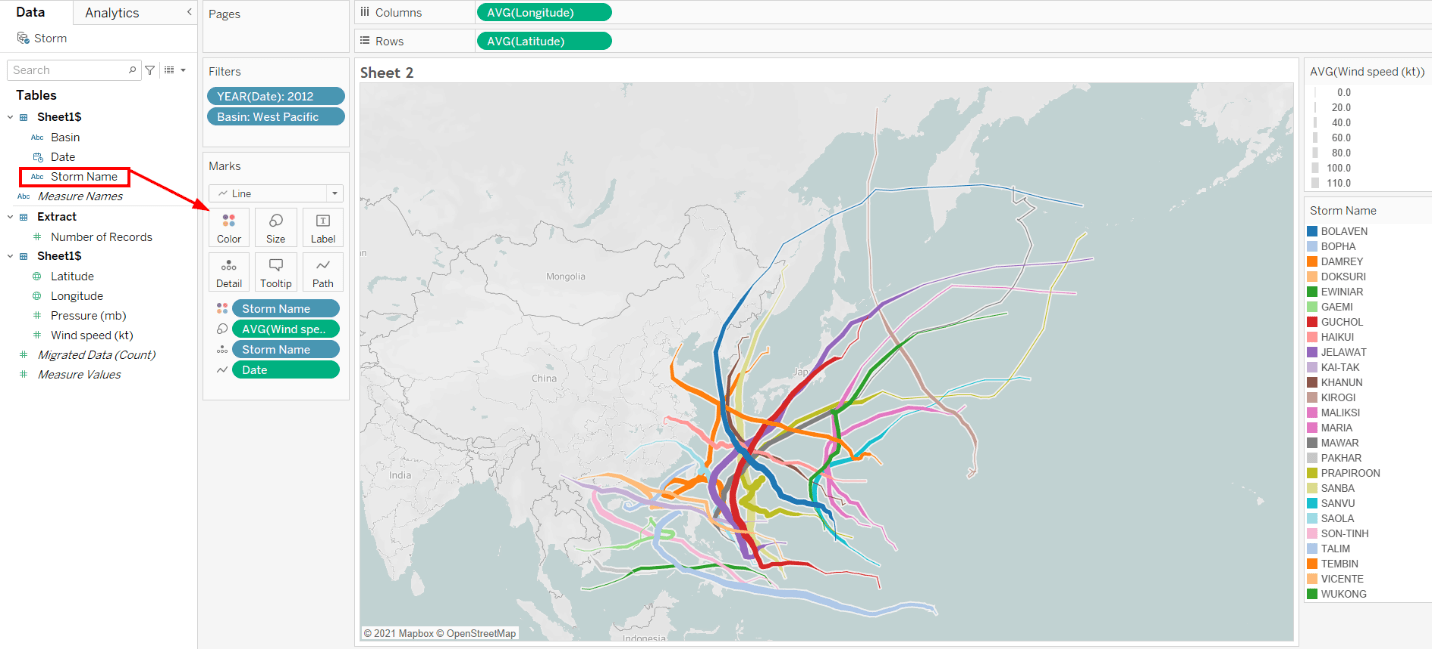
For more information, see Flow Maps or Path Maps in detail.
3) Proportional Symbol Tableau Custom Maps
A Proportional Symbol Map is a great start to acquire quantitative values for individual locations. Nevertheless, your data source should contain quantitative values, longitude and latitude coordinates to create Proportional Symbol Maps. Download Example Workbook to learn more in detail.
- Step 1: Download Example Workbook.
- Step 2: Open the downloaded file on Tableau Desktop.
- Step 3: Open a New Worksheet.
- Step 4: Drag Latitude and Longitude to the sheet.
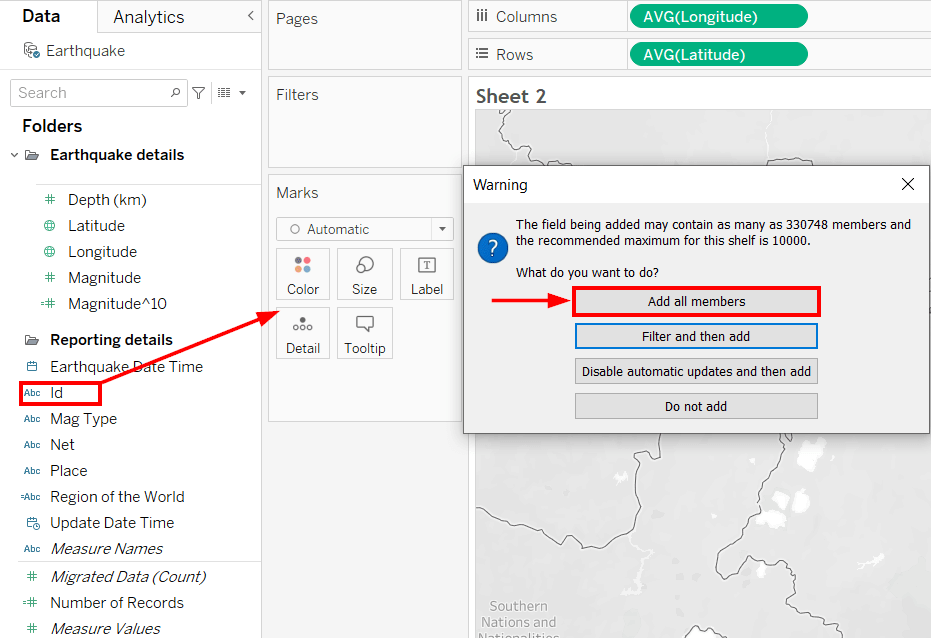
- Step 5: Select the ID from the Data pane and place it over the Details icon.
- Step 6: A dialog box will appear, select Add All Members.
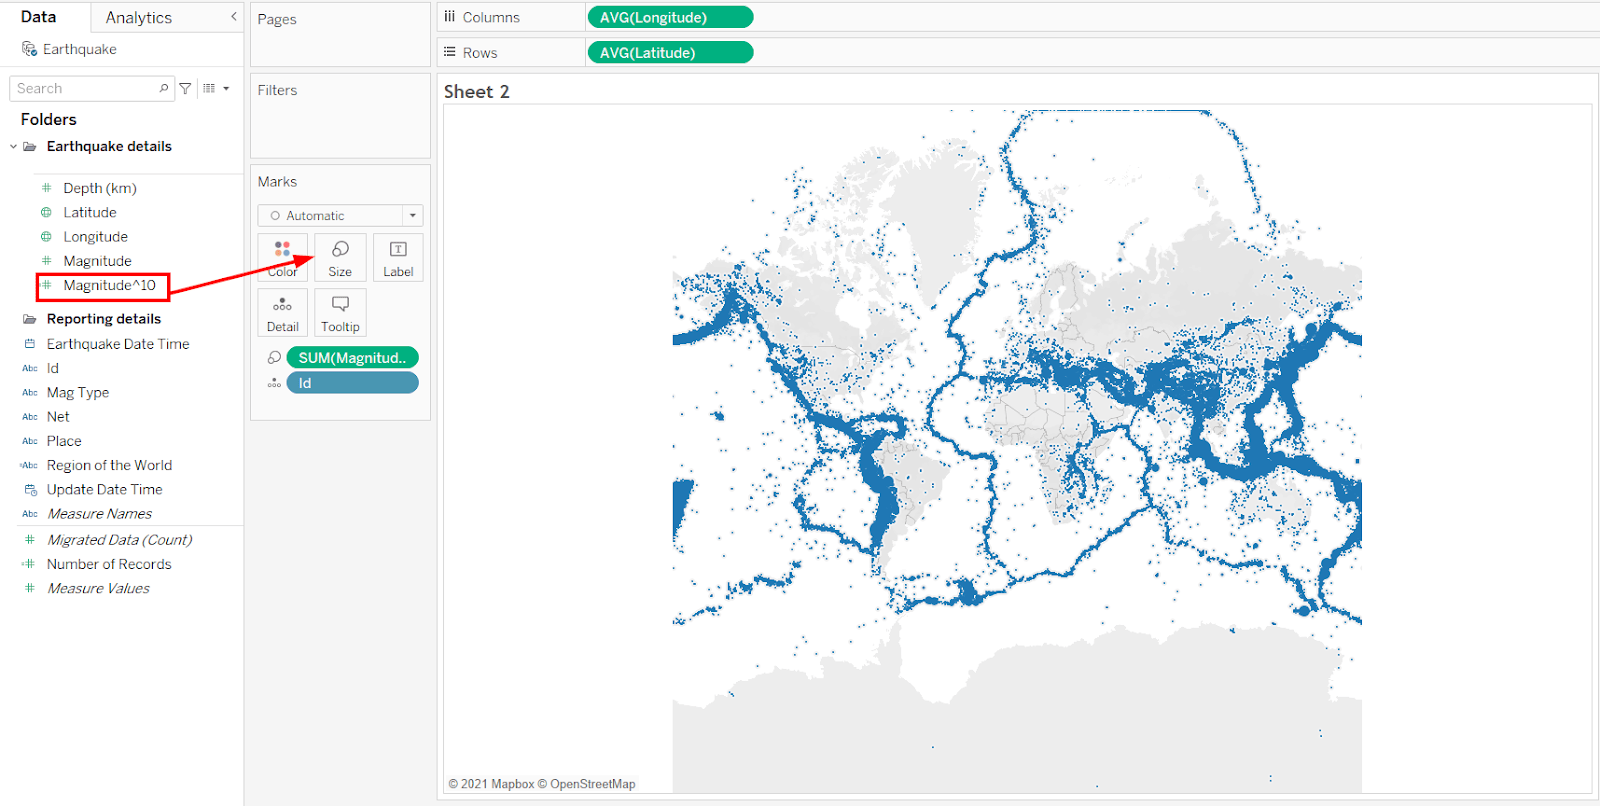
- Step 7: Select Magnitude^10 and place it over Size in Marks.
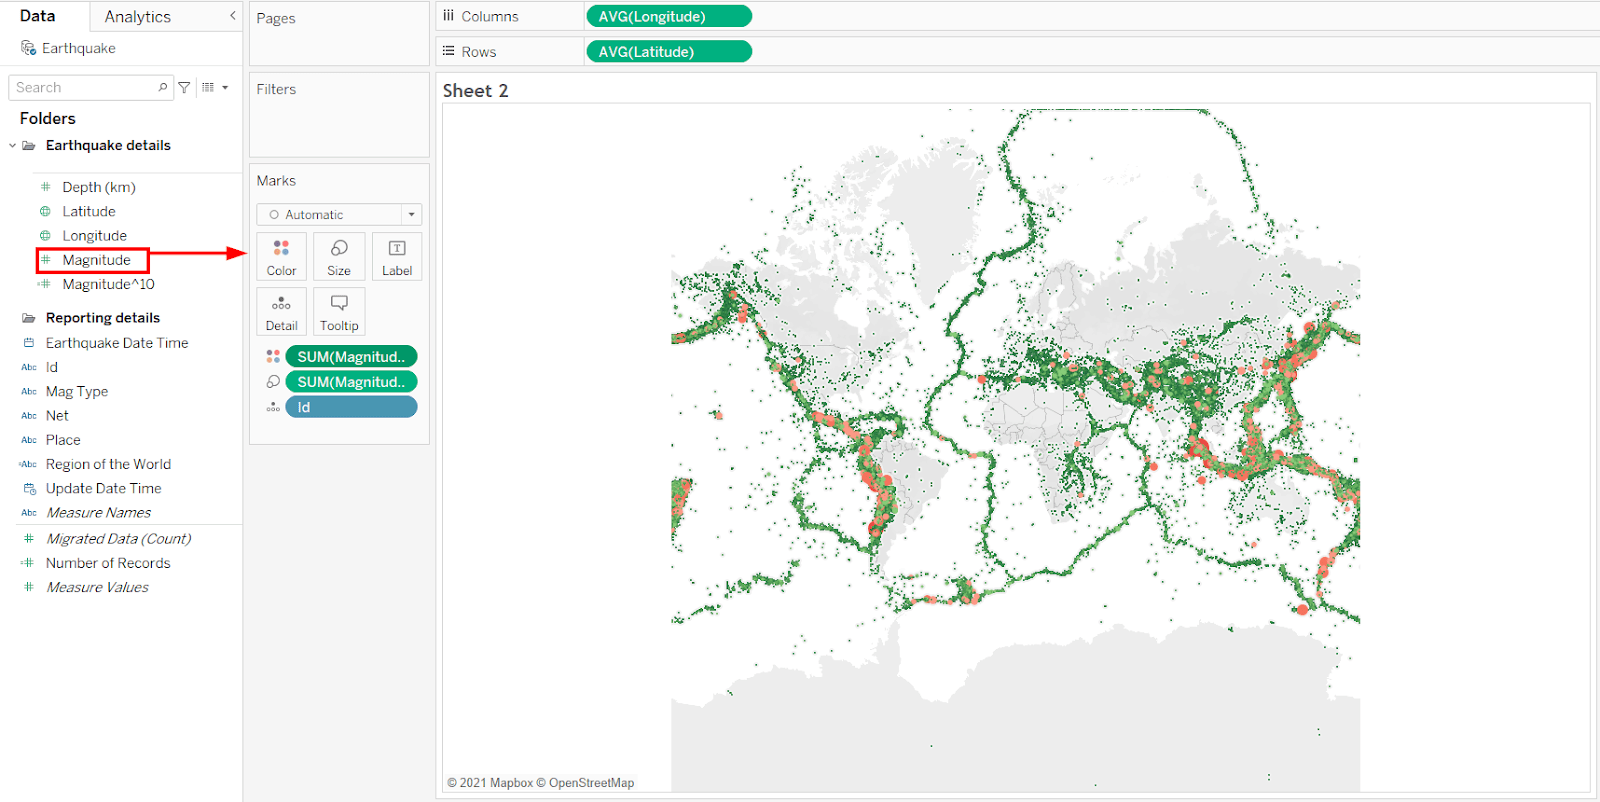
- Step 8: Grab the Magnitude to Color option.
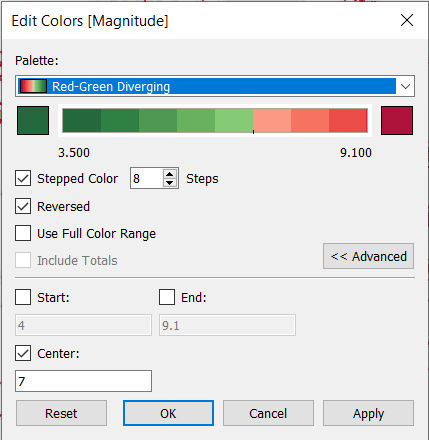
- Step 9: Click on Edit Colors from the Color icon.
- Step 10: Select your preferred color, opacity (70%), and Border.
- Step 11: Click on Stepped Color and choose 8.
- Step 12: Click the Reversed checkbox.
- Step 13: Click on Advanced, click Center, and enter 7.
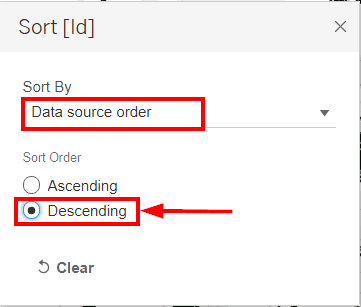
- Step 14: Right-click over the ID and select the Sort option.
- Step 15: Choose Descending for Sort Order option.
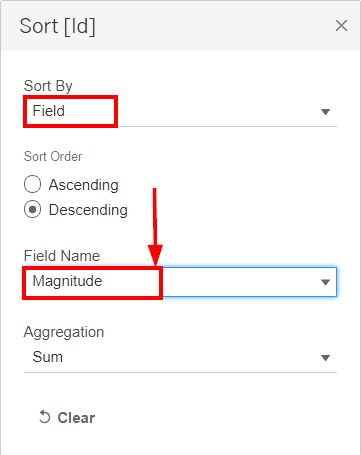
- Step 16: Choose Fields for Sort By option and then choose Magnitude.
- Step 17: Click OK.
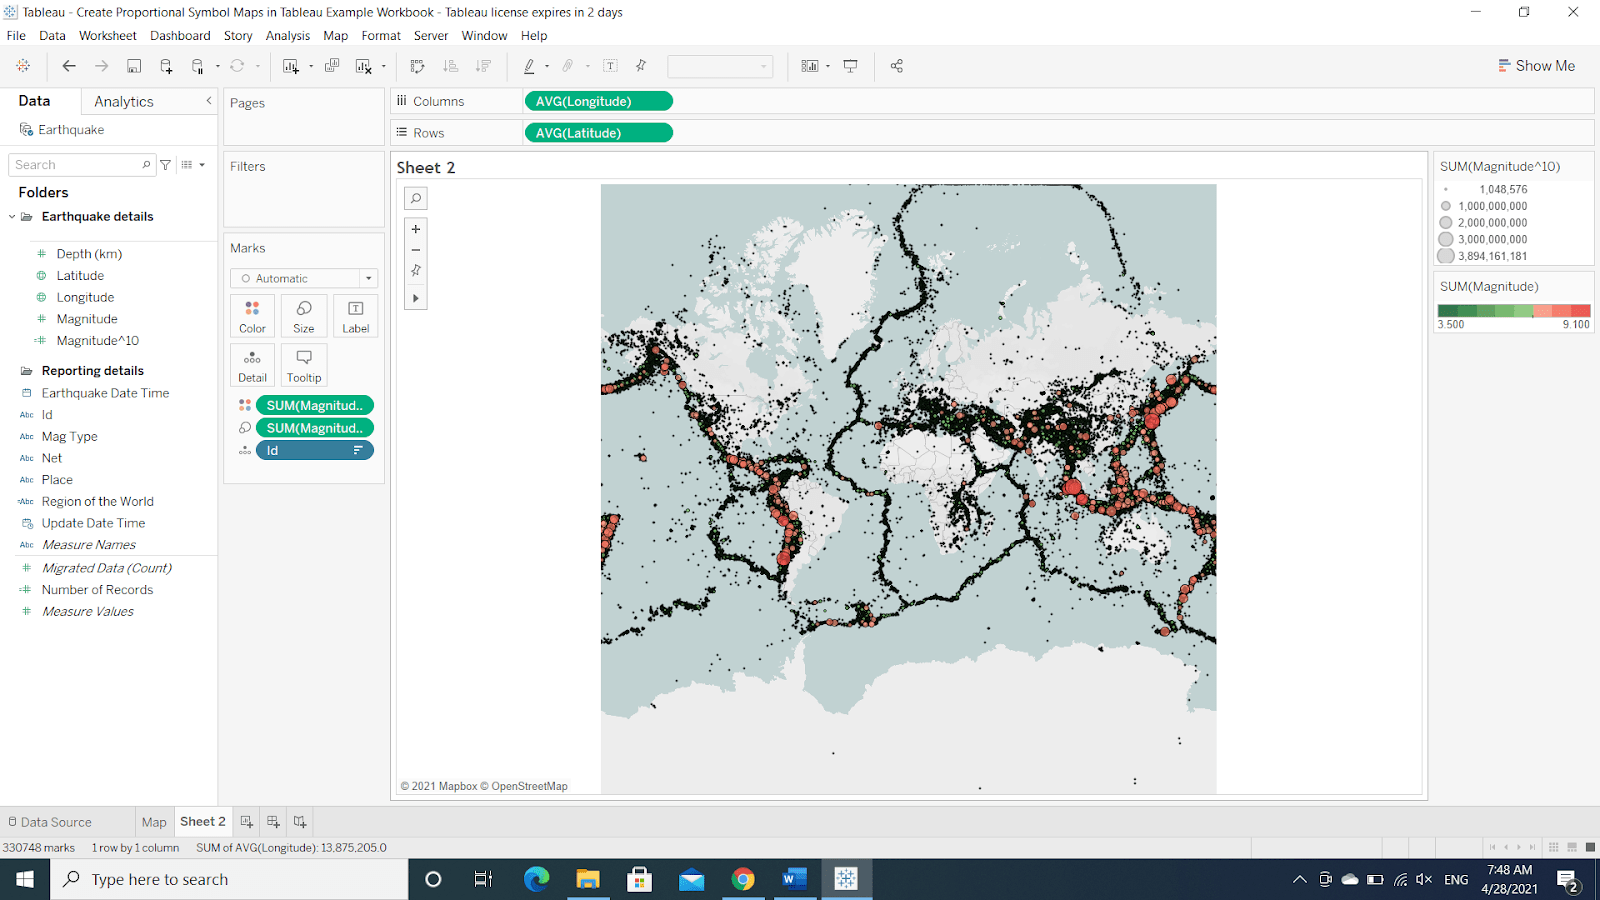
- Step 18: Select any appropriate background for your map. The final image of the map might look like this.
To explore more, see Proportional Symbol Maps in detail.
4) Point Distribution Tableau Custom Maps
Everyone loves to spot visual clusters, and Tableau Desktop makes this process super easy through Point Distribution Maps. But your data source should have longitude and latitude coordinates to map visual clusters. Download the Example Workbook right now and implement the following steps:
- Step 1: Open Tableau Desktop and select a New Worksheet.
- Step 2: Click on the Latitude dimension.
- Step 3: Select the Geographic Role.
- Step 4: Choose the Latitude parameter.
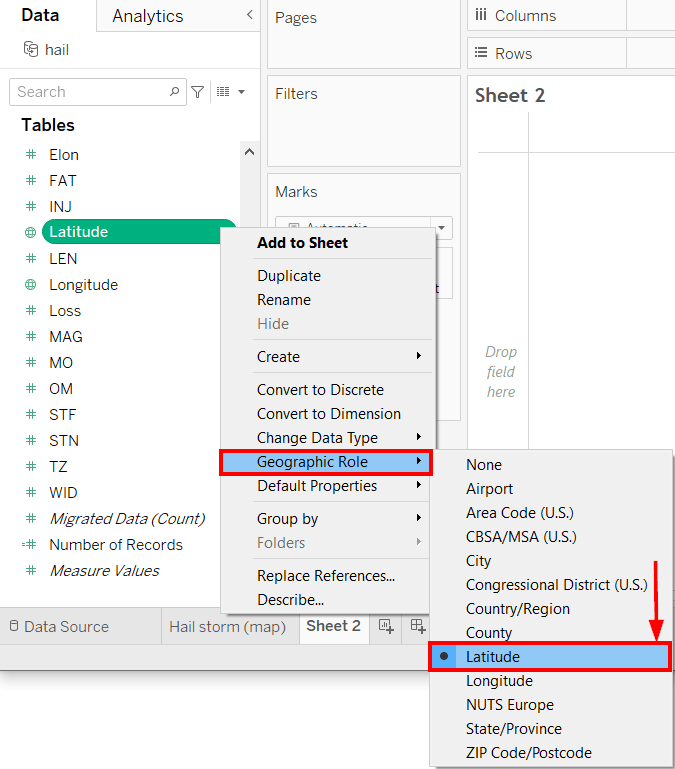
- Step 5: Click on the Longitude dimension.
- Step 6: Select the Geographic role.
- Step 7: Choose the Longitude parameter.
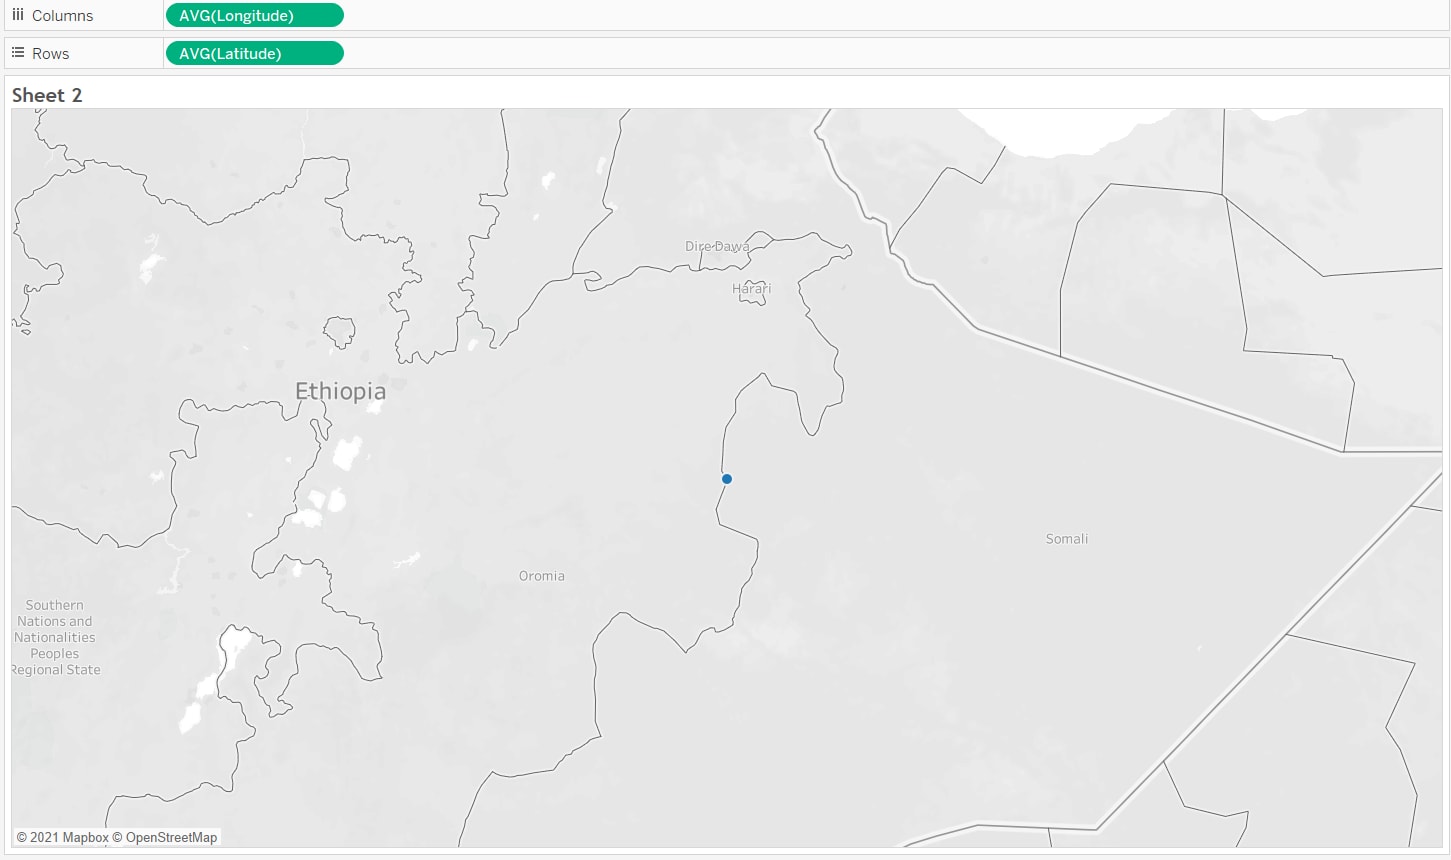
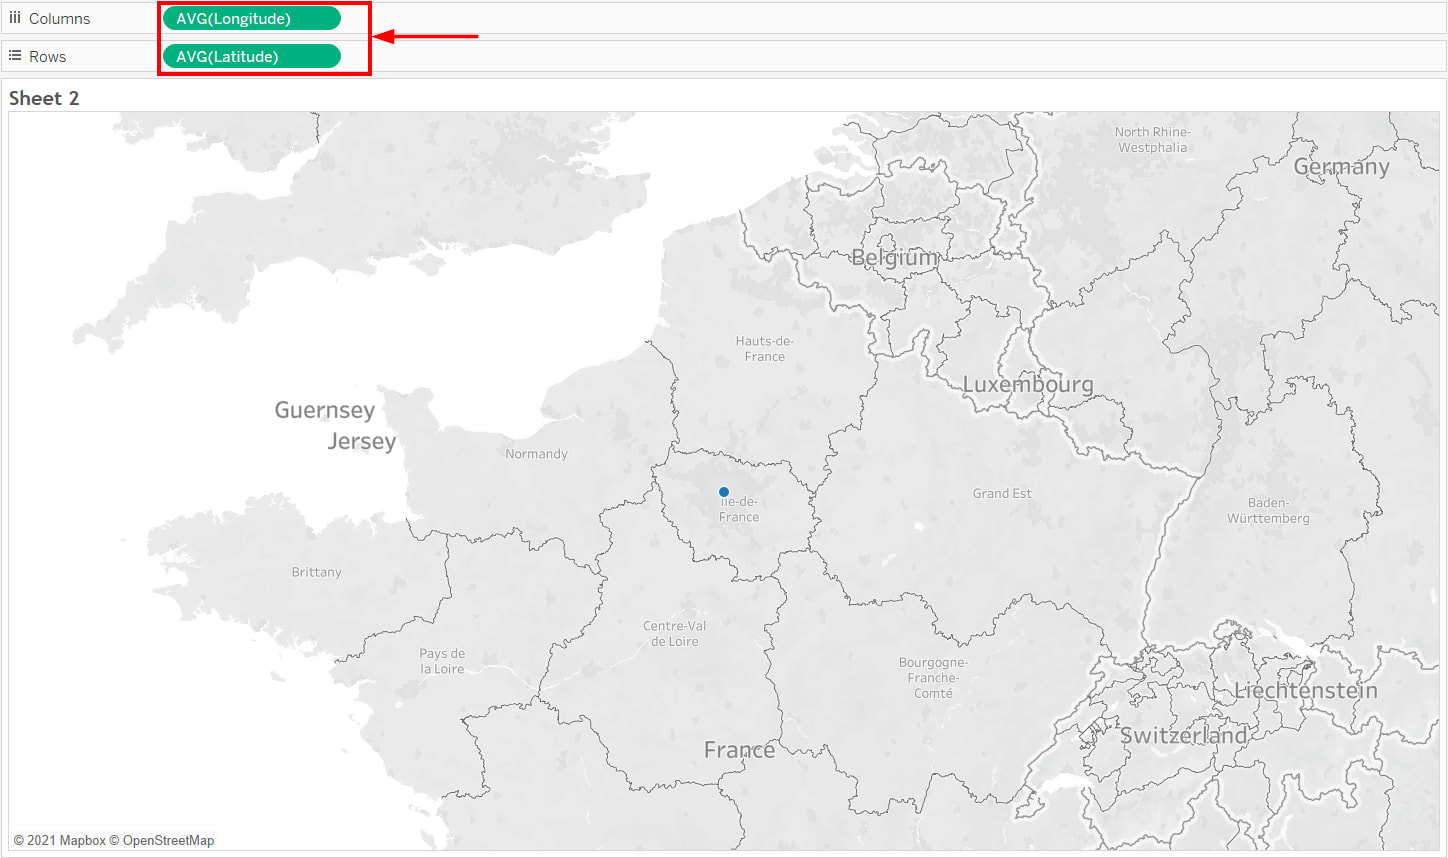
- Step 8: Double-click over both Longitude and Latitude dimensions.
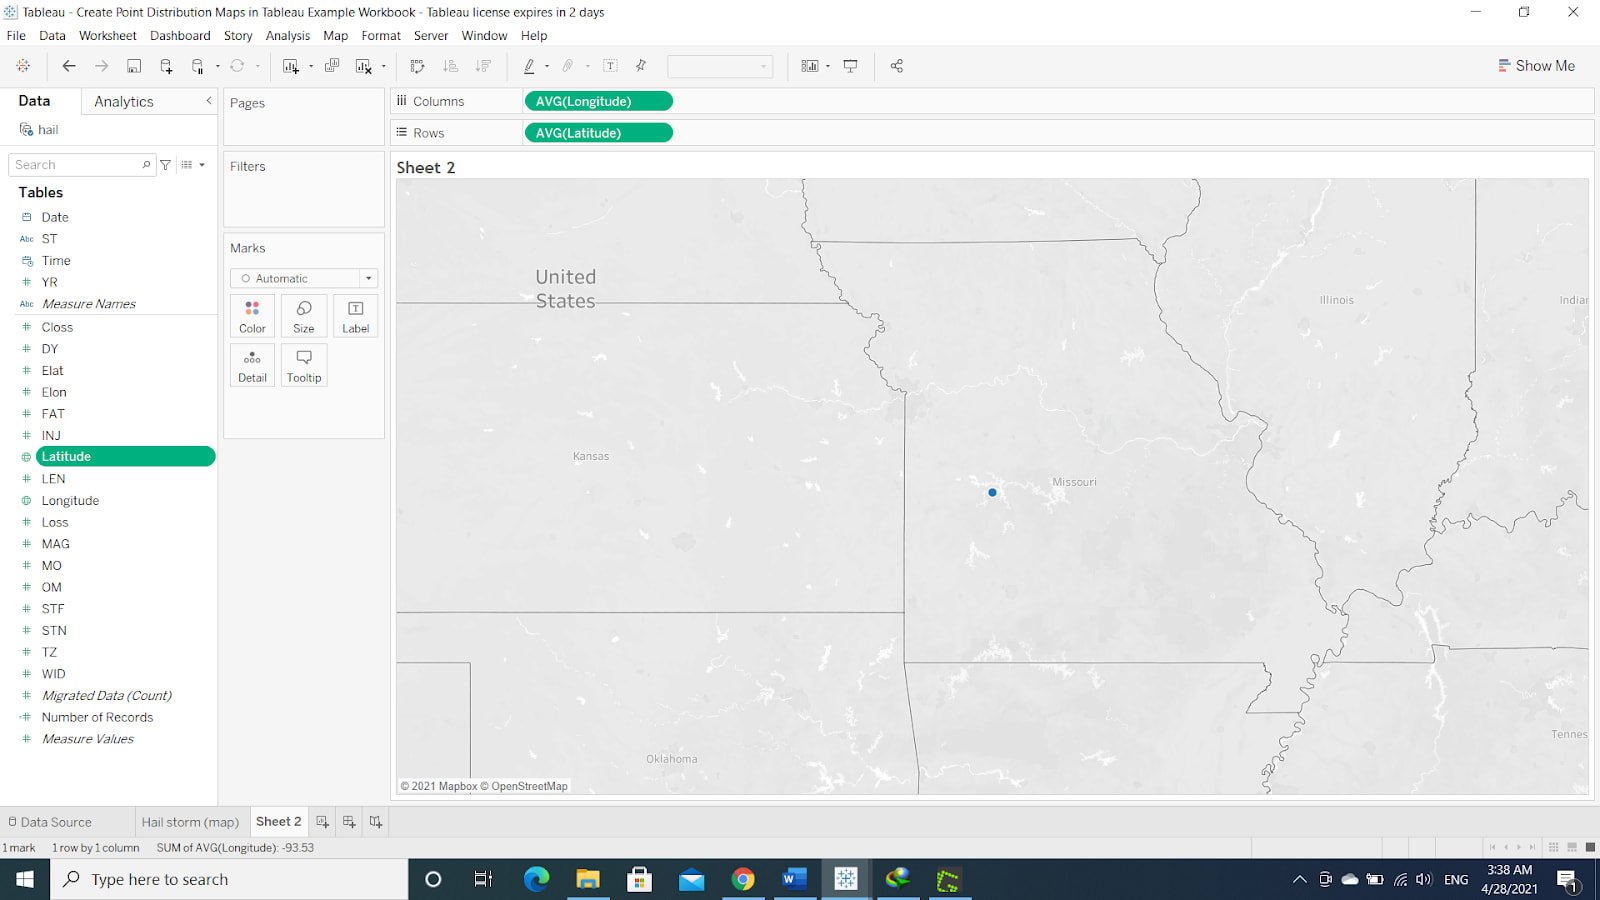
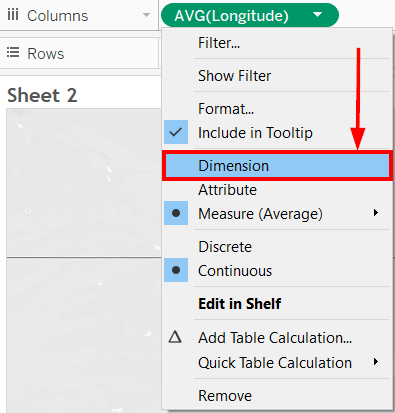
- Step 9: Click on the AVG(Longitude) and select Dimension.
- Step 10: Click on the AVG(Latitude) and select Dimension.
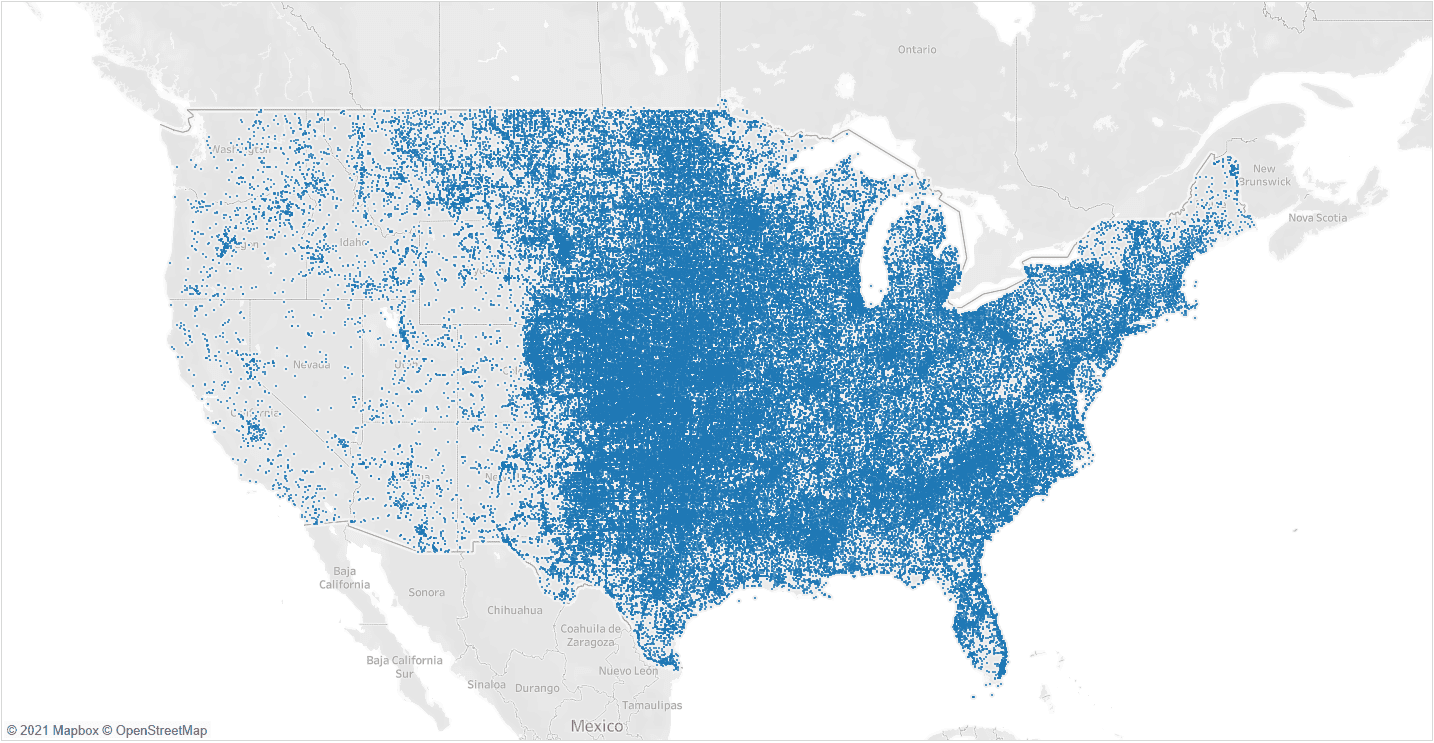
The map might look like something as follows:

To make it clearer, move your cursor to the Marks card.
- Step 11: Click on the Size.
- Step 12: Move the bar to the left edge.

- Step 13: Zoom the graph to get the entire picture.
To learn more about point distribution maps, see Visual Clusters of Data.
5) Heat or Density Tableau Custom Maps
Heat Maps, also known as Density Maps, show you trends, uncover patterns and unveil relative concentrations. Take the above Point Distribution Map, for instance and implement the following steps:
- Step 1: Go to Marks pane.
- Step 2: Click on the Automatic option.
- Step 3: Select Density from the drop-down menu.
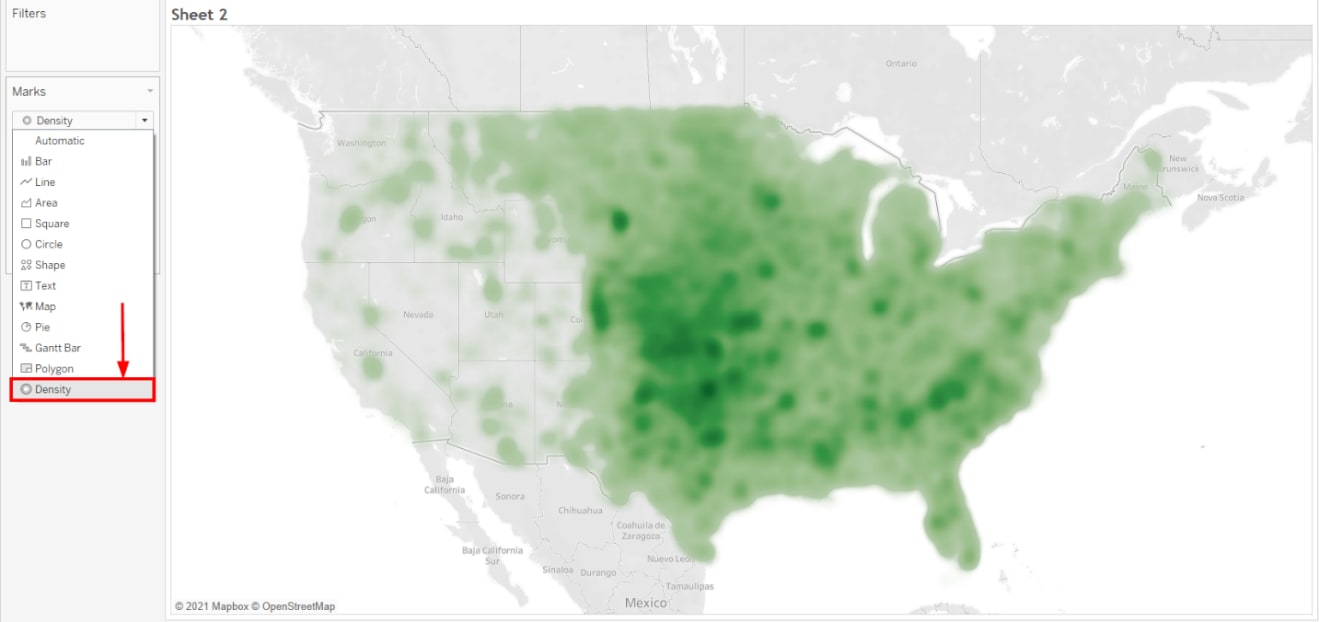
However, Tableau Desktop enables you to create more effective heat maps when the data points of a small geographic region are greater. But to plot heat maps, your data source must contain Longitude and Latitude coordinates. Download the Example Workbook, helping you to explore more about Density Maps.
- Step 4: Open in Tableau Desktop.
- Step 5: Create a New Sheet.
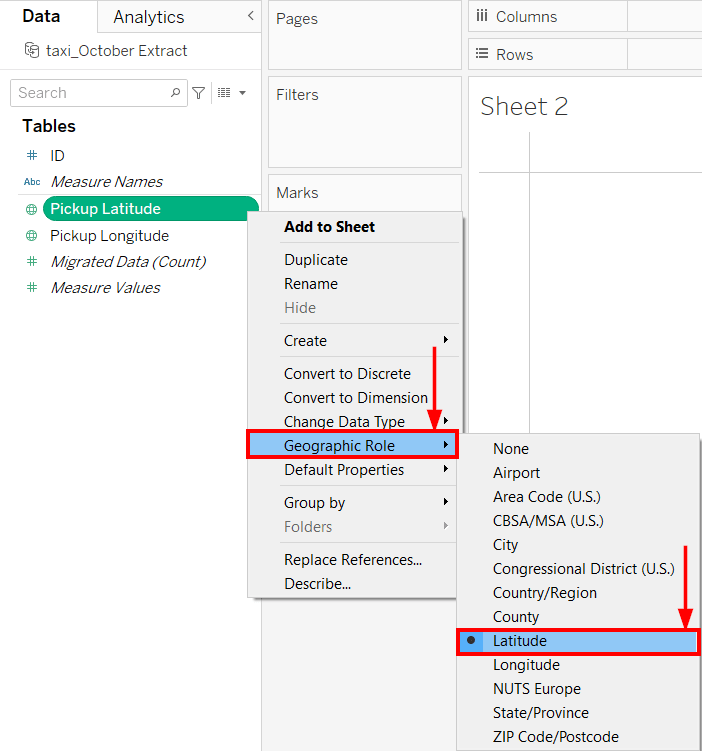
- Step 6: Assign Latitude Geographical Role to PickupLatitude.
- Step 7: Assign Longitude Geographical Role to PickupLongitude.
- Step 8: Double-click over Pickuplongitude.
- Step 9: Double-click over Pickuplatitude.
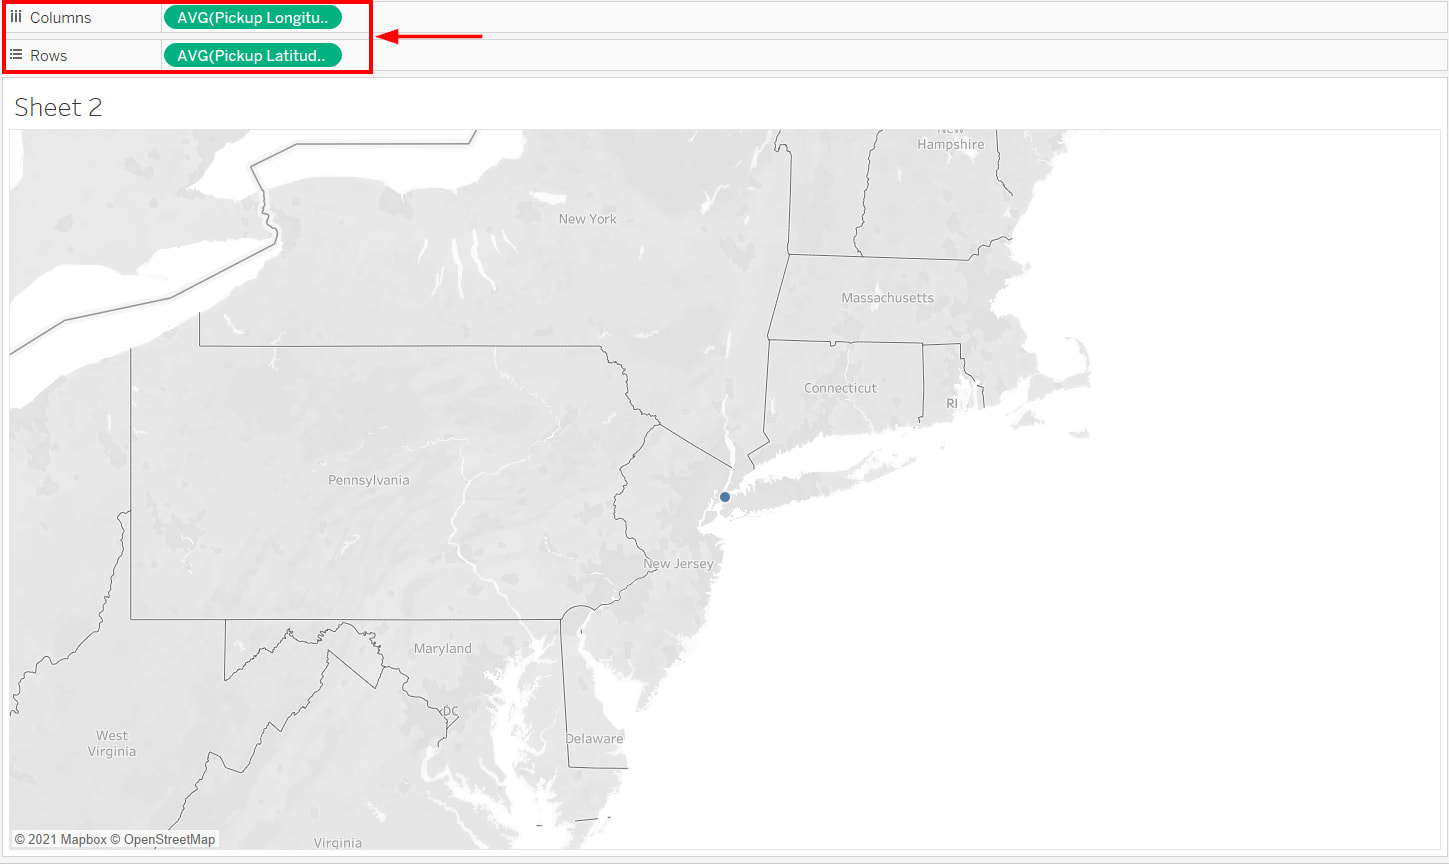
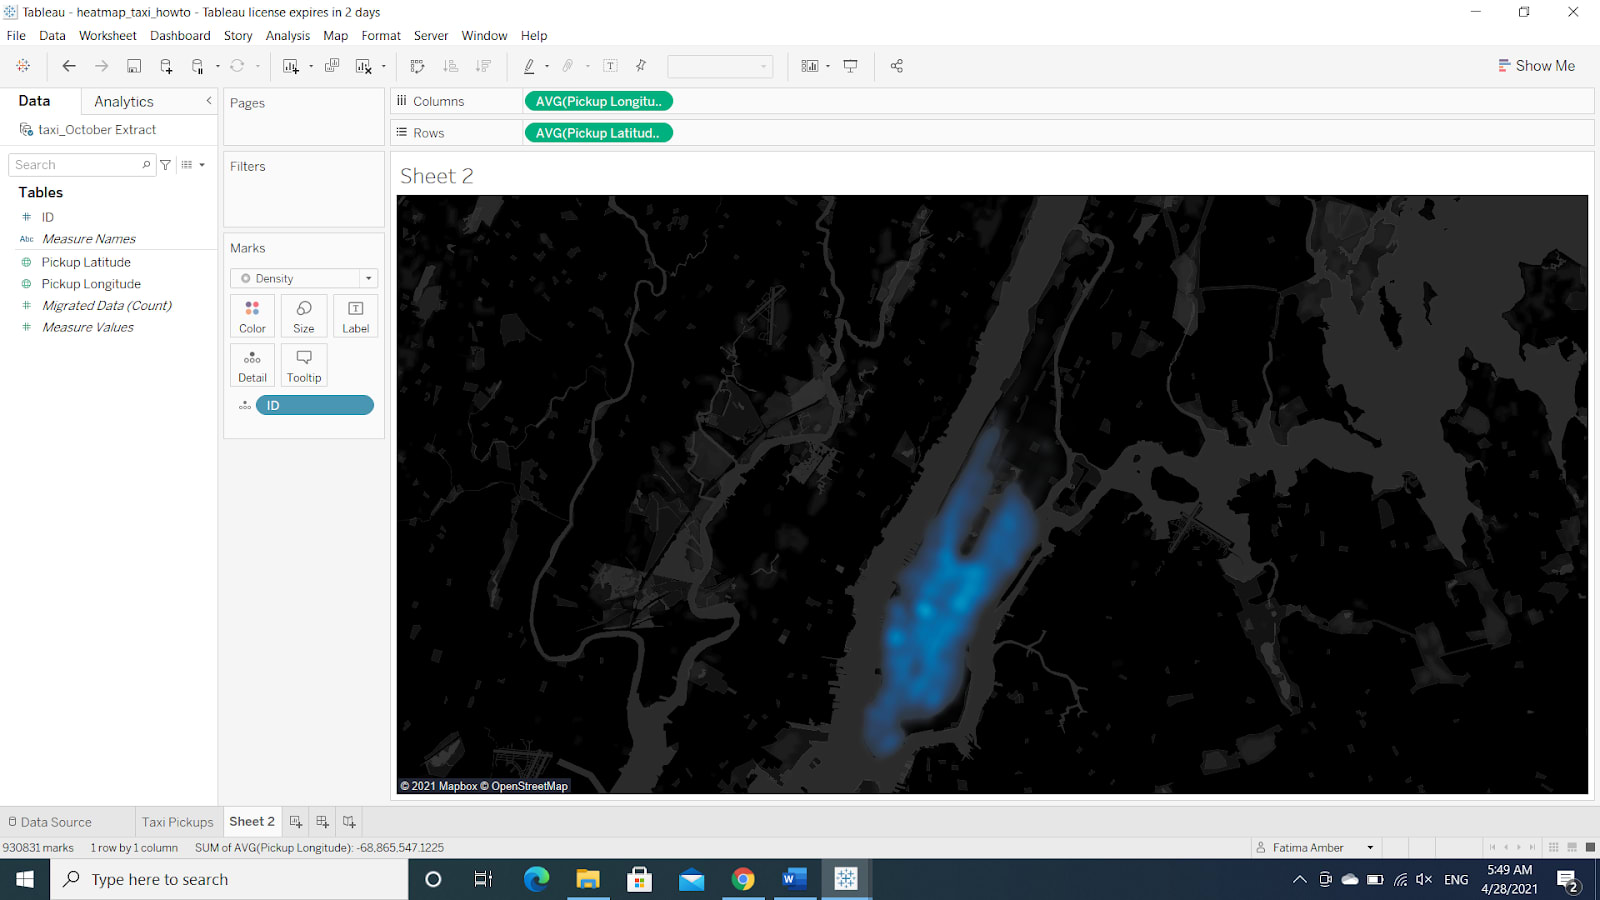
- Step 10: Drop the ID dimension from the Data pane to Sheet.
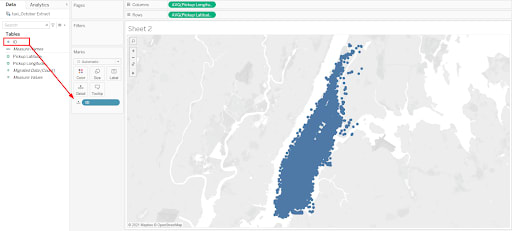
- Step 11: Simple Heat can be created by selecting the Density option from the Marks pane.
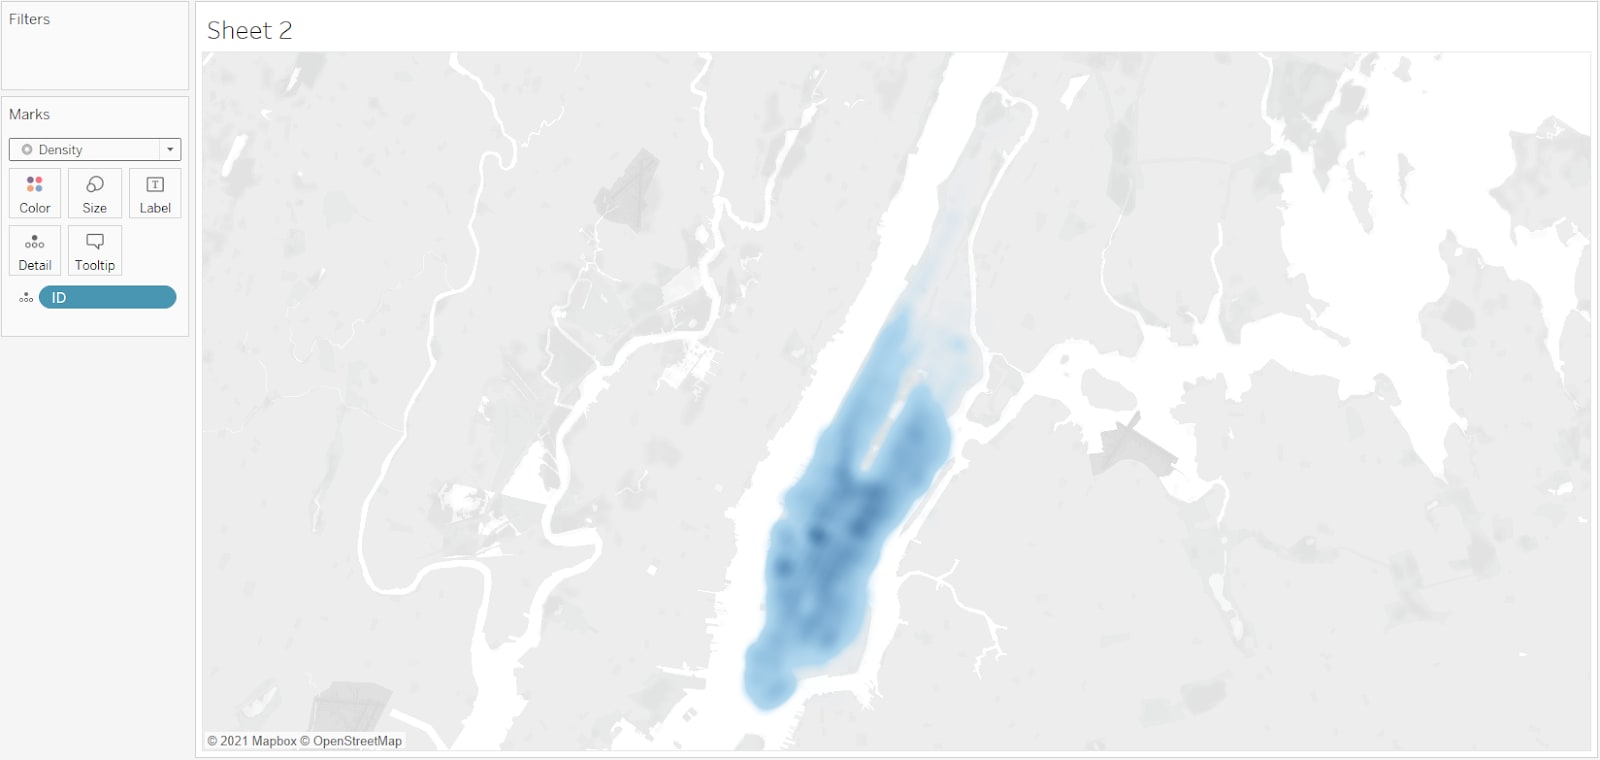
- Step 12: If you want to change the appearance of the map, select color options from the Color parameter.
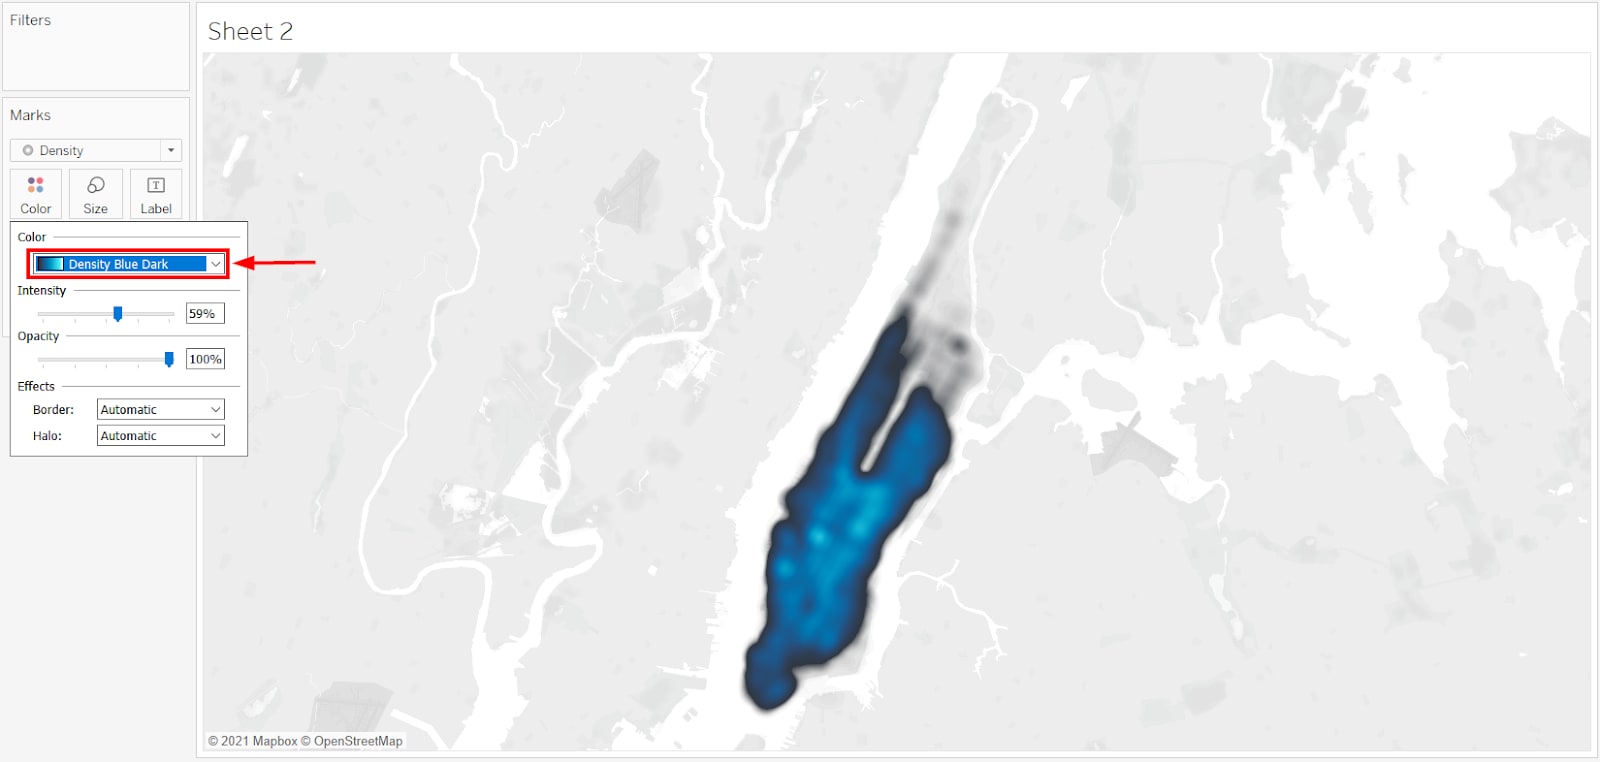
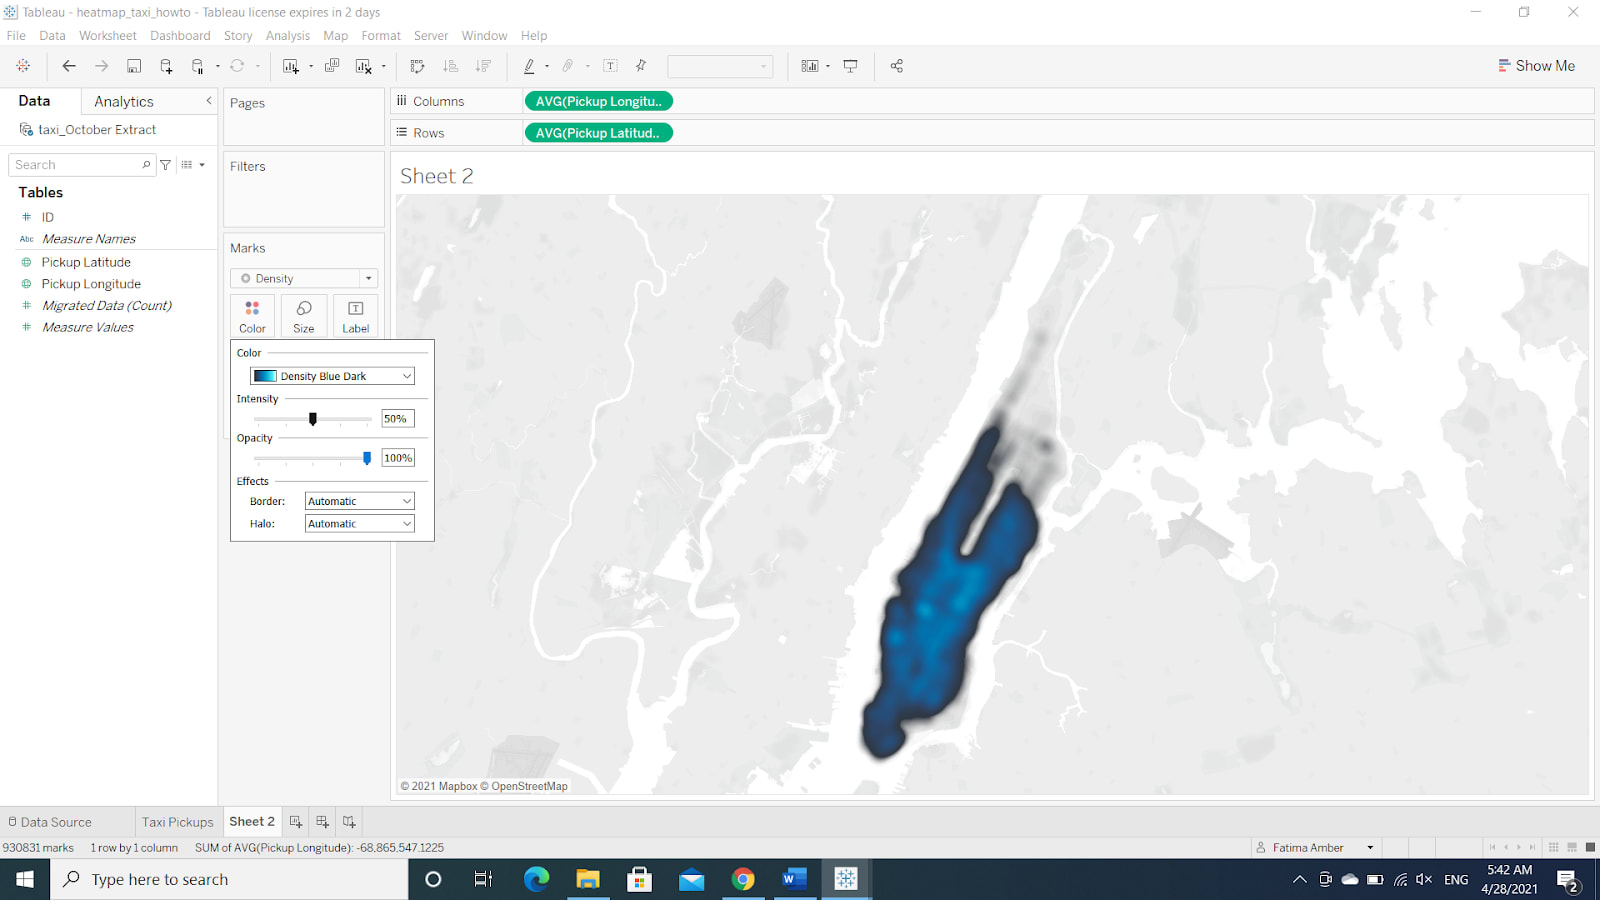
- Step 13: Change the intensity level to 50% and analyze the map.
- Step 14: Go to the Maps tab.
- Step 15: Select the Background Maps.
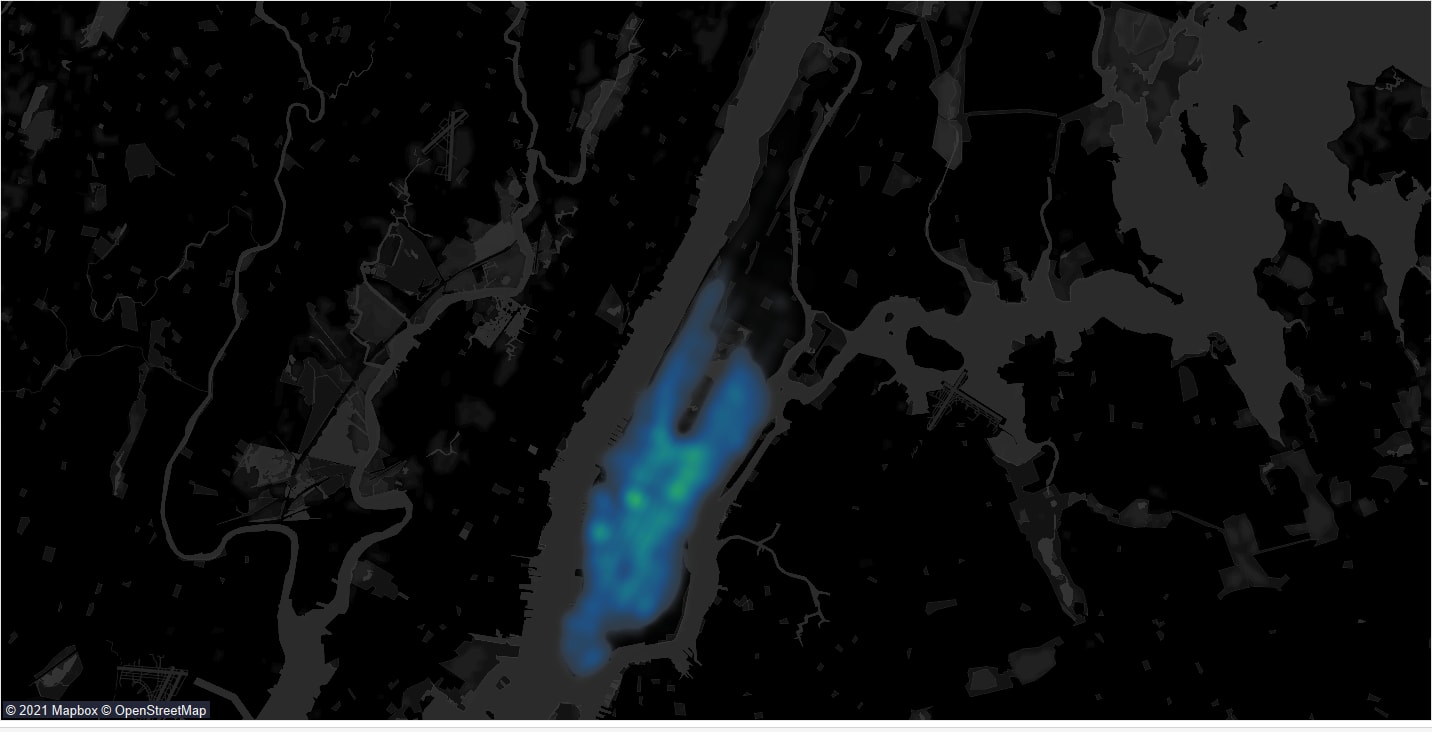
- Step 16: Select Dark instead of Light.
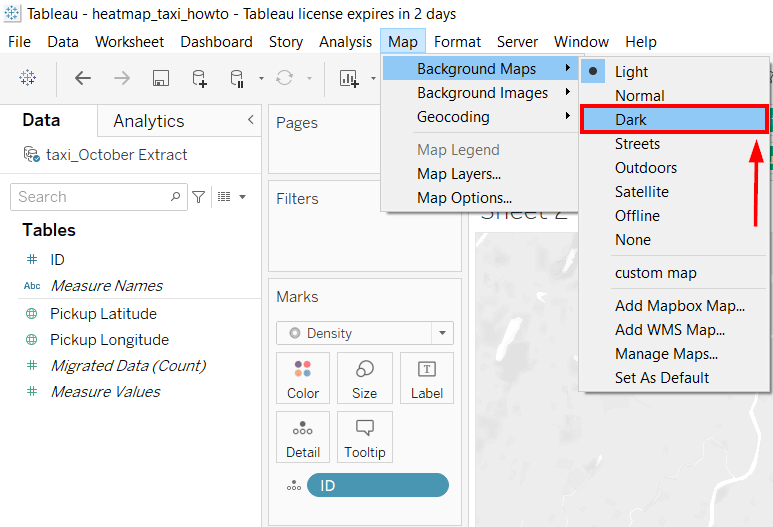
The Heat map might look like this.
If you change color to Density Multi–Color Dark, the density becomes more visible.
For more information, see Heat Density Maps.
6) Spider or Origin-Destination Tableau Custom Maps
In Tableau Desktop, you can present paths between origins and destinations through Spider or Origin-Destination Maps. Let's determine the procedure to design a Spider Map in Tableau Desktop.
- Step 1: Download Example Workbook.
- Step 2: Open a New Worksheet.
- Step 3: Drag Longitude and Latitude from Measures to Sheet.
- Step 4: Select the Line Group (Path ID) and place it over the Details area.
- Step 5: Select Line instead of Automatic from Marks pane.
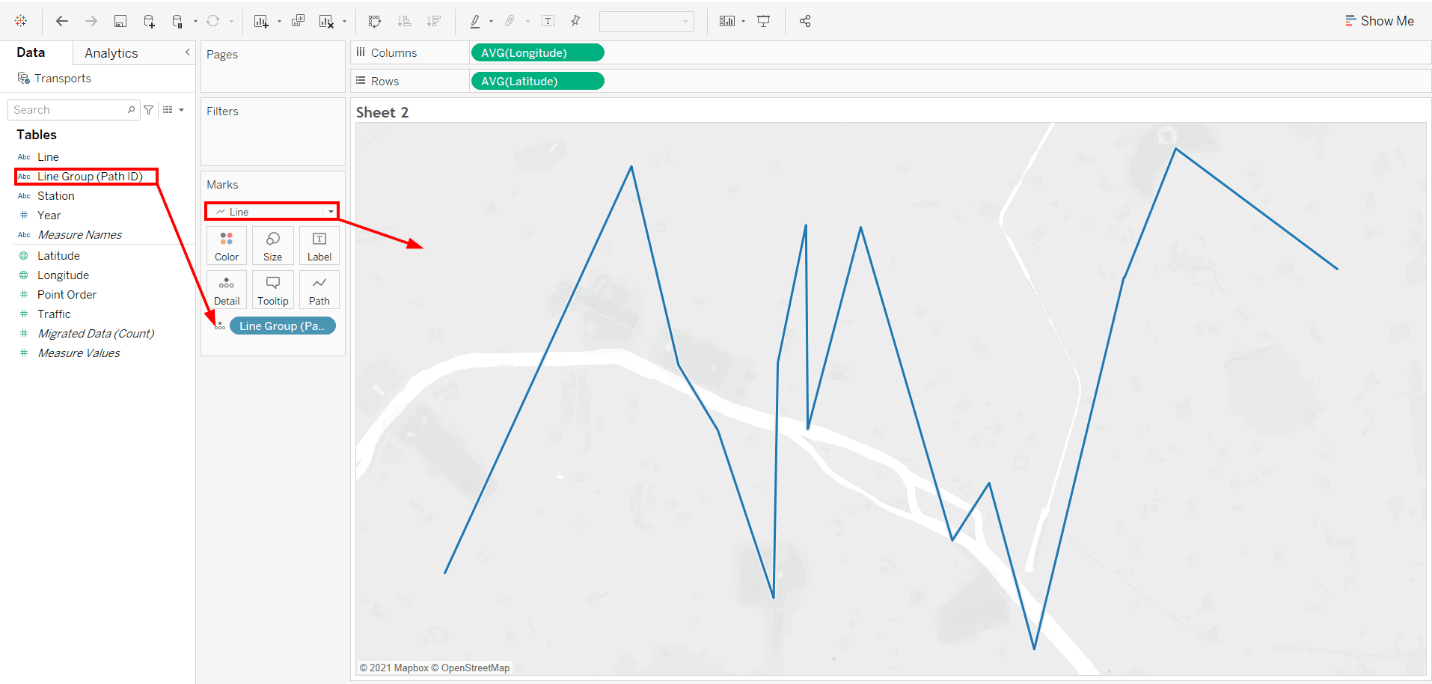
- Step 6: Select Point Order from Measures and place it over the Path area.
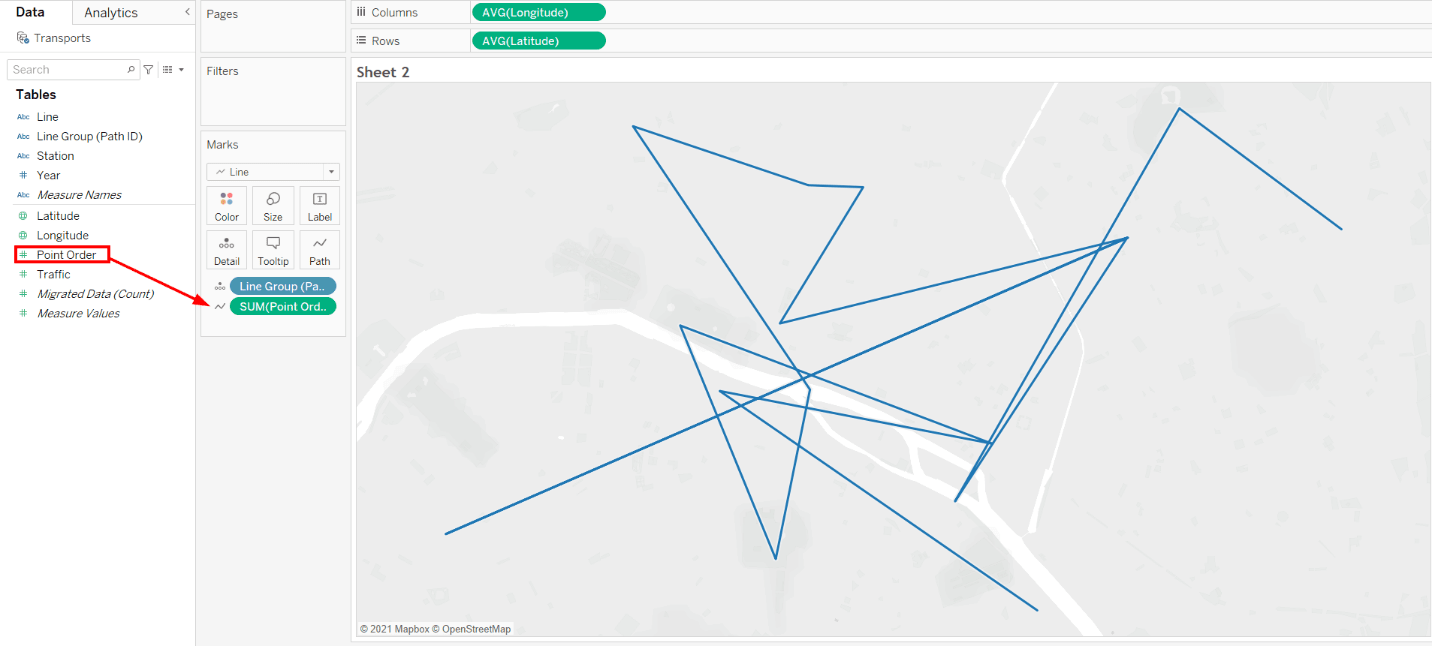
- Step 7: Right-click over Point Order and choose the Dimension from the drop-down menu.
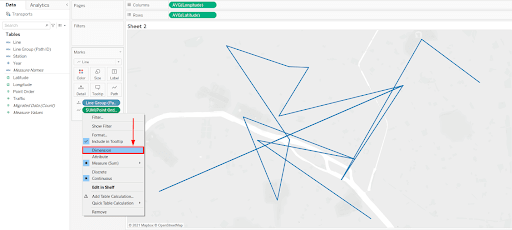
- Step 8: Place Line Group (Path ID) over the Color area.
- Step 9: Select Longitude and place it at the Column shelf.
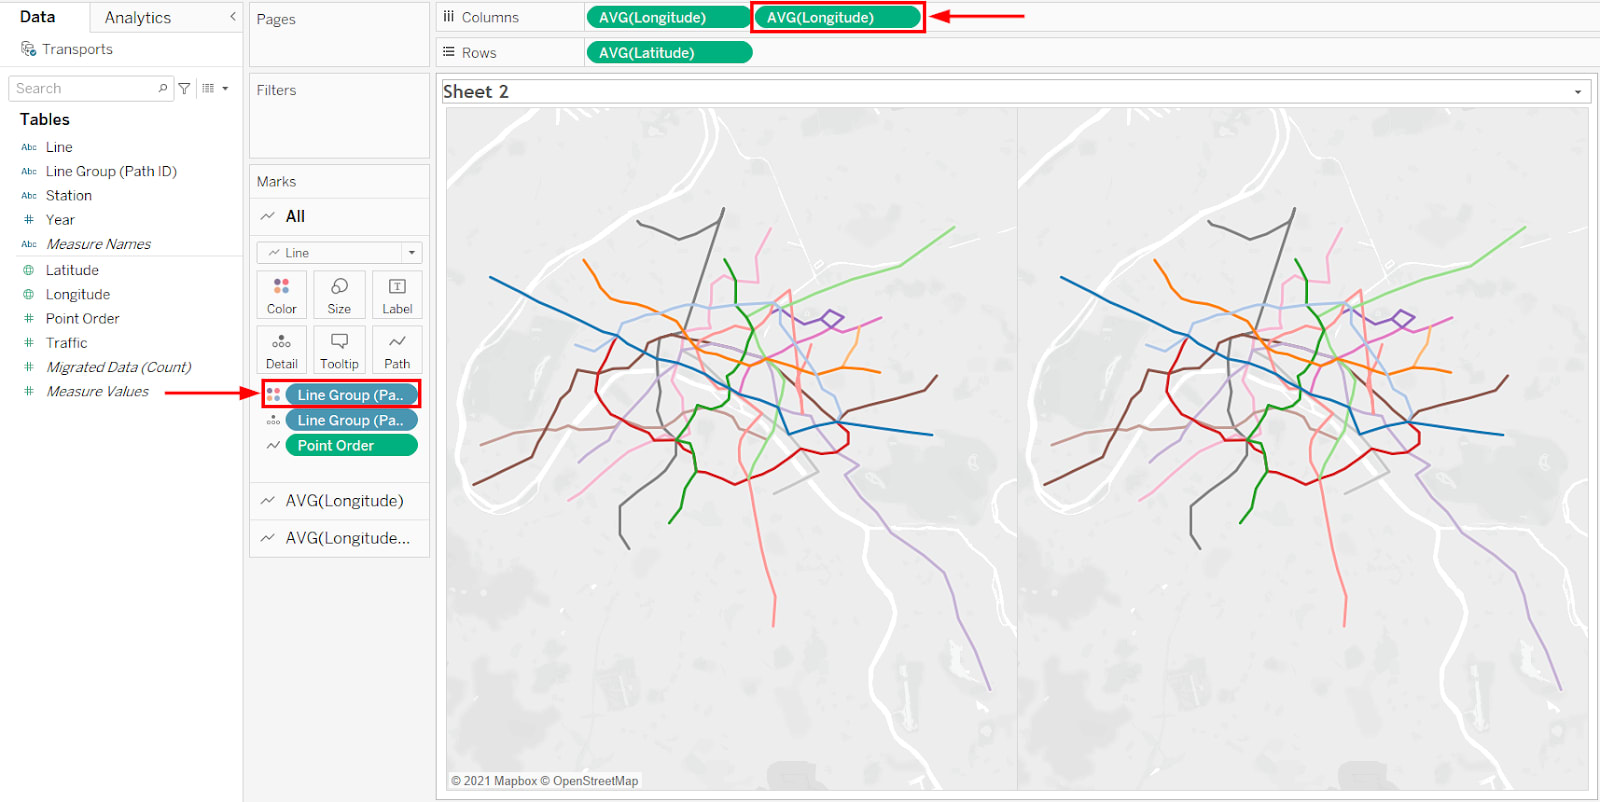
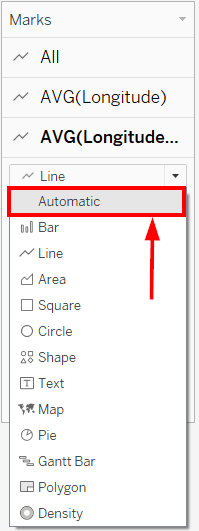
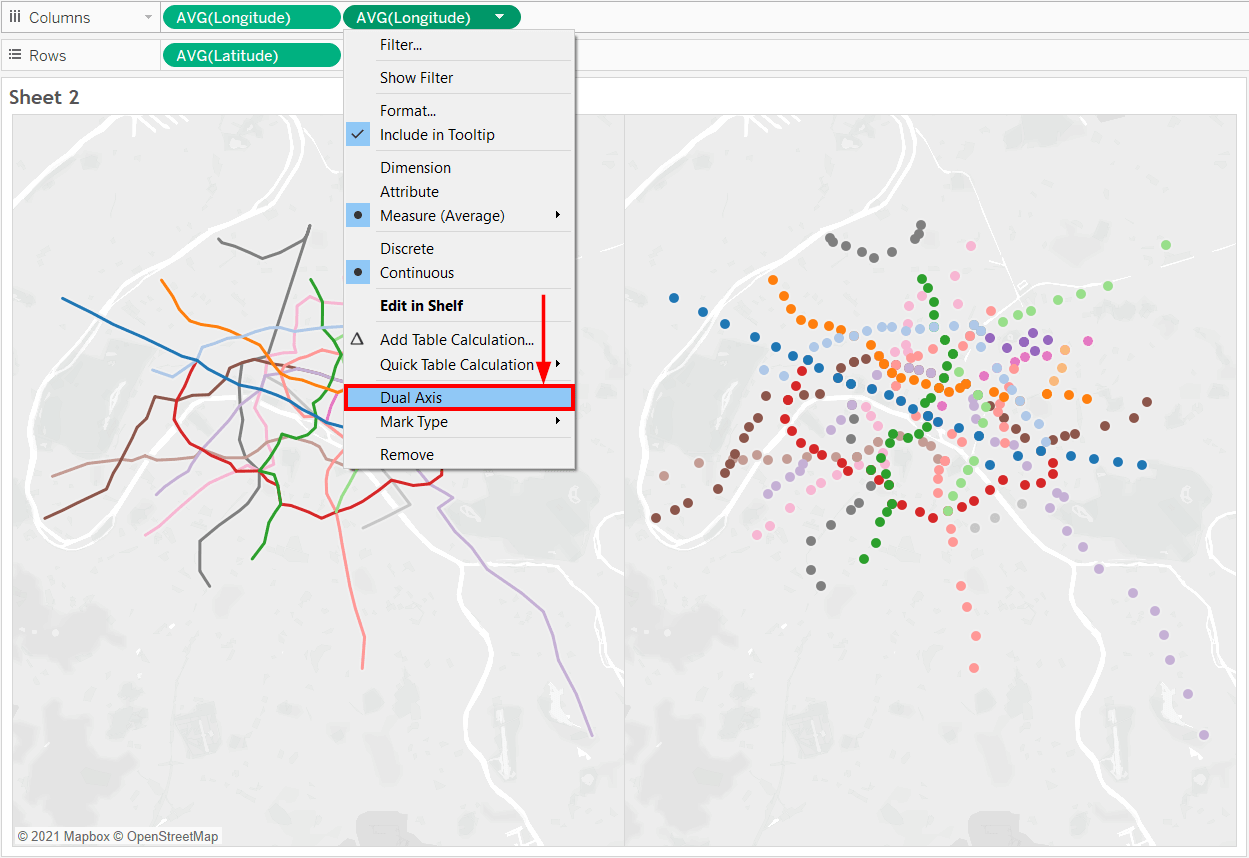
- Step 10: Click over the AVG(Longitude) and select Automatic.
- Step 11: Select the AVG(Longitude) from the column shelf and choose Dual Axis.
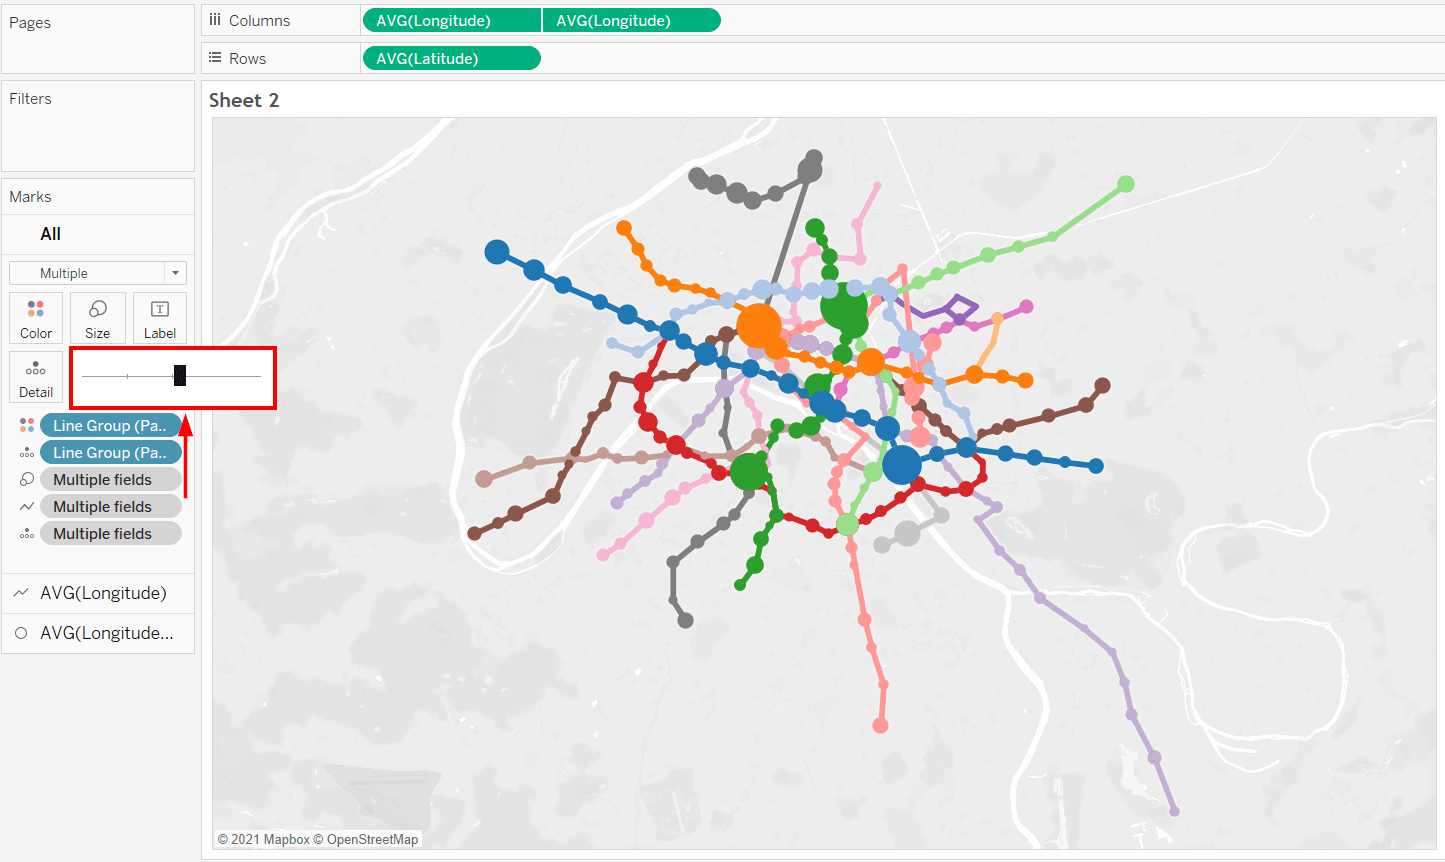
- Step 12: Select the Traffic and place it over the Size of AVG(Longitude).
- Step 13: Choose Size and move the slider to the right edge.
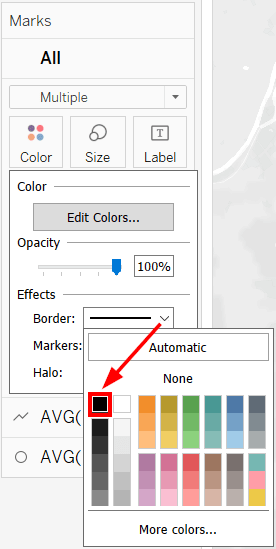
- Step 14: Select the Border color from the Edit Color option of the Mark sheet.
The full map might look like the below picture.
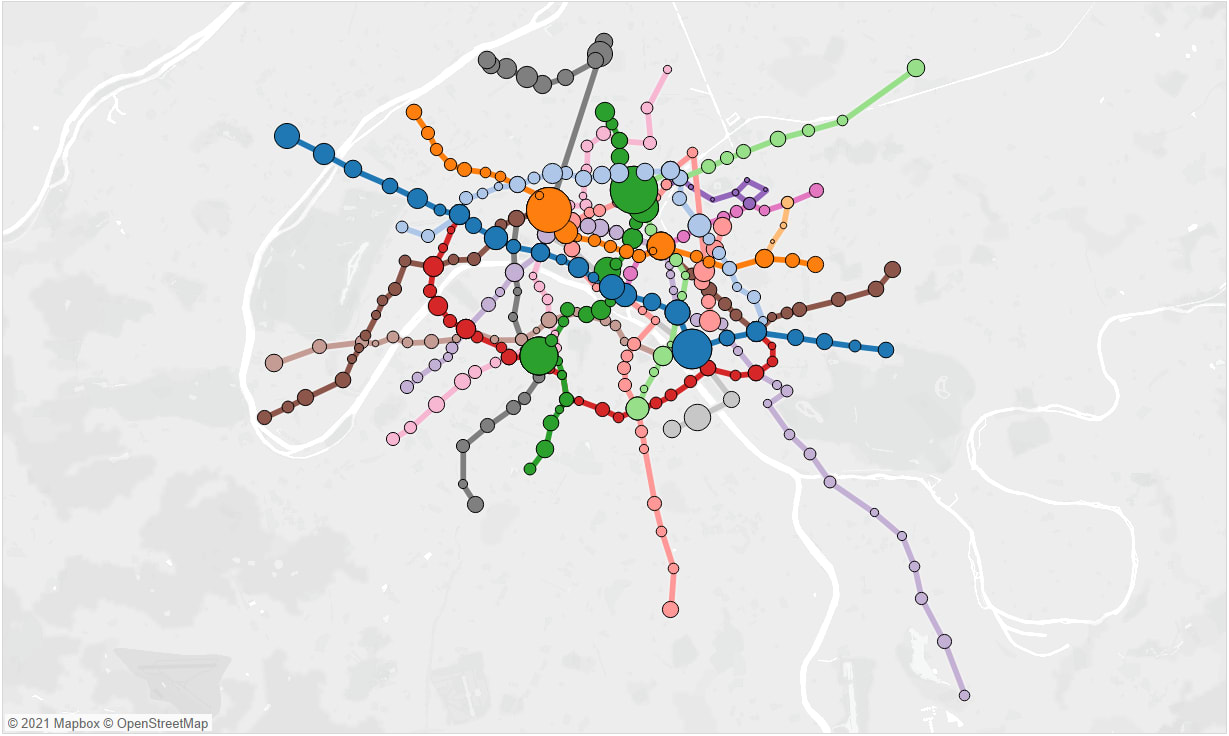
For more information, visit Origin Destination Map.
Conclusion
Map visualizations are significant to interpret spatial details. In Tableau Desktop, you can build both simple and spatial files, as discussed in this blog. In this comprehensive guide, you got an understanding of different ways to build Tableau Custom Maps, including Choropleth Map, Proportional Symbol Map, Heat Map, Flow Map, Point Distribution Map, and Spider Map. Although this article only covers the simple steps, you can learn more at Tableau Custom Maps.
Choosing a Business Intelligence and Data Analysis tool for your business can be a tough decision primarily because almost all departments in a business such as Finance, Marketing, etc. now make use of multiple platforms to run their day-to-day operations and there is no single tool that can integrate with all these sources easily. Hence, businesses can consider using automated Data Integration platforms like Hevo.
Hevo helps you directly transfer data from a source of your choice to a Data Warehouse, Business Intelligence tools such as Tableau, etc., or desired destination in a fully automated and secure manner without having to write the code. It will make your life easier and make data migration hassle-free. It is User-Friendly, Reliable, and Secure.
Details on Hevo's pricing can be found here. Give Hevo a try by signing up for the 14-day free trial today.
How To Create Map Chart In Tableau
Source: https://hevodata.com/learn/tableau-custom-maps/
Posted by: clarkciect1992.blogspot.com
0 Response to "How To Create Map Chart In Tableau"
Post a Comment